This post has been updated in 2 sections :
Choosing necklines
Changing a pattern neckline
–
Do you know what is the best neckline for you ? There’s much to consider. There’s the shape of neckline that enhances your upper body. There’s the shape of neckline that flatters your face. And the widths and depths of neckline that go best with your proportions. All that before you even think about pattern making techniques for changing a neckline.
– – –
The neckline shape that flatters your body :
If you search ‘choose neckline’ you’ll find a lot of guidance, especially about the best necklines for your body shape, your combination of neck, shoulders and bust. These are some of the links I like, and which give different perspectives :
[The links I gave in early 2010 are now very out of date. Search ‘neckline” to get a useful selection.]
(P.S. see also Amy Herzog’s ‘Fit to Flatter’ tutorial on necklines.)
– – –
What about flattering your face :
To think about this, you need to be aware of the shape of your facial features – your jaw, lips, nose, eyes, eyebrows – are the edge lines straight or curved ?
‘The Triumph of Individual Style’ is an expensive beautiful book with many reproduction art works of women. The aim is to show that, whatever your shape, someone has found it worth celebrating. There’s an interesting section on facial features, pp. 16 – 21.
Once you’ve decided whether your features are straight or curved, there’s confliciting advice about what to do with this information. Some people say the best neckline echoes the shape of your features. Others say the best neckline counteracts your features, so use curved shapes if you have an angular face, angular ones if you’re curved. Perhaps the choice between these attitudes depends on personal style, rather than there being one answer which is right for everybody.
The shapes of your face might influence for example whether you look better in a V-neckline with straight edges or with a slightly curved shape.
So do some experimenting. Cut neckline shapes from kitchen towel and try them out.
‘The Triumph of Individual Style’ says you can wear any shape of neckline, so long as it balances your face with your body. Though they recommend echoing your jawline.
Personally I agree with going for shapes that echo the curves of my features. Necklines with sharp angles seem out-of-kilter with my face. But then I prefer softer curved looks anyway. And also, I’m old enough to have ‘jowls’. I find my best neckline is the shape that echoes what my jawline shape used to be 😀
– – –
Width of neckline :
Gale Grigg Hazen has an ingenious suggestion about measuring necklines, in her book “Fantastic Fit for Every Body”. Use a 6 inch x 24 inch transparent (quilters) ruler to measure how wide your neck is, and how far your straps are from your centre line.
 (GGH-FFEB p.170)
Use these measures to check pattern necklines : wide enough for your neck ? too wide to cover your straps ?
‘The Triumph of Individual Style’ says your neckline or collar opening should be wider than the widest part of your face. For most of us that means we aren’t at our best in a jewel neckline which is close fitting round the neck.
– – –
Depth and balance :
‘The Triumph of Individual Style’ has some fascinating suggestions about flattering neckline depths, pp. 49 – 55. They suggest two ‘balance points’, for high necklines and low.
All their measurements need to be made vertical and straight, with a ruler. Not over the bumps, as you would using a tape measure.
High neckline
Measure vertically from the widest part of your face to the tip of your chin. Your widest point could be at your forehead, your check bones, or somewhere on your jaw.
I’m 3-1/2 inches vertical from cheek bone to tip of chin.

Measure that distance down from the neck end of your shoulder.
Across from there is the most flattering point for your upper neckline.
On me this comes at the level of my collar bones. I’ve long known that a neckline closely fitting my neck doesn’t look good on me.
Low neckline
Measure vertically from your hairline to the tip of your chin.
Or, if you always wear a hair style that substantially covers your forehead, measure down from your hair.
I have a long face, and on me this is 8 inches.

Wear something that you don’t mind sticking a pin into or marking.
Measure the length of your face down from the tip of your chin, On me that comes near my bust point.
Mark that level, which is said to be the most flattering level for lower necklines.
You need to convert this to a measure that can be compared with a pattern. So measure from the neck end of your shoulder down to the pin or marker, this time using a tape measure on your body. Because of collar bones and bust, that is likely to be longer than the vertical measure down from your chin.
I’ve got prominent collar bones, and on me this measurement is 11 inches.
If this point comes low on you, you need to think what this means for you personally. With my long head, the low neckline point comes so low it would need a lot of double sided tape to be at all decent, and would be much more revealing than suits my style. But that doesn’t mean I can’t emphasise necklines to this level. It explains why I like wearing long necklaces, and deep V necks on layering tops and jackets, which are all coming down to that level.
So if you need modesty you could have a more obvious neckline going down to this point, filled to a higher level by something less obvious. And I’m trying out emphasising this level using embellishment, a corsage, or a necklace pendant.
(P.S. Now I know about these balance points, I keep spotting celebrity examples. Wear your neckline below the low balance point if you want all the attention to be on your cleavage !
I think the necklines of most patterns are developed on models with long necks.)
Cut test necklines from kitchen towel, or drape scarves, and see what you think. Image consultant suppliers sell sets of basic neckline shapes made from calico. You can try a much wider variety if you make your own !
– – –
To change a pattern neckline :
To change a neckline, first draw in the stitching lines on the existing pattern. It’s easy to do this with a transparent French Curve with 5/8 inch marked round the curved edge. These lines show the position of the shoulder seam and the finished neckline edge.
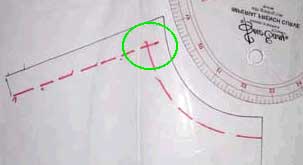
The crucial point to identify is where the neck edge meets the shoulder seam, sometimes called the neck point.
So long as you draw your new front finished neckline through this point, you won’t have to alter the back neckline (or vice versa).

If you want a wider or narrower neckline, draw in the new finished neckline position. Then measure how far the new neckline is from the old neck point, along the shoulder seam. Use this measure to find where to start the new back neckline.

To add the new cutting line :
– make some marks 5/8 inch from the stitching line.
The ends of both a tape measure and a seam gauge are 5/8 inch.

– Then join the marks into a smooth curve – easy to do with a French Curve.

Changing the neckline of a wrap top/ dress is a bit more complex. Here’s a tutorial.
P.S. There’s now a Craftsy class by Suzy Furrer on drafting necklines.
– – –
Collars :
Of course, getting the best neckline shape is essential, but only the first step. Then there are collars, bias drapes, bows, ruffles, whatever. But presumably these additions follow the same principle – that they are best when they coordinate with the lines, shapes, and proportions of our bodies.
For example, big collars need to be in proportion to our overall build. (I’ve just been attracted by a large collar jacket pattern, but fortunately thought of checking my personal croquis. A deep collar wider than my shoulders, on a short jacket, would make me look like a heffalump. . .) ‘The Triumph of Individual Style’ has illustrations showing how to adapt classic collar shapes to high and low neckline balance points. And Darlene Miller’s book ‘Your shape, your clothes and you’, has illustrations suggesting curved collars go with curved bodies and straight with straight.
(P.S. There’s a class on drafting simple collars at eSewingWorkshop.
There’s now a Craftsy class by Suzy Furrer on drafting collars.)
Lots of possibilities to think about and try.
– – –
Links available February 2010
– – –
To get to main blog, click on red header.


 (GGH-FFEB p.170)