Changing a pattern neckline
You like a pattern except for the neckline ? or you want to try a different shape ?
Changing a neckline is quite easy pattern work.
First draw in the stitching lines on the existing pattern. It’s easy to do this with a transparent French Curve with 5/8 inch marked round the curved edge. These stitching lines show the position of the shoulder seam and the finished neckline edge.
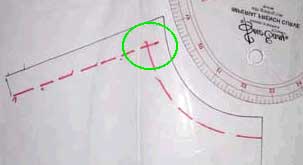
The crucial point to identify is where the neck edge meets the shoulder seam, sometimes called the neck point.
So long as you draw your new front stitching line-finished neckline through this point, you won’t have to alter the back neckline (or vice versa).

If you want a wider or narrower neckline, draw in the new finished neckline position. Then measure how far the new neckline is from the old neck point, along the shoulder seam. Use this measure to find where to start the new back neckline.

To add the new cutting line :
– make some marks 5/8 inch from the stitching line.
The ends of both a tape measure and a seam gauge are 5/8 inch.

– Then join the marks into a smooth curve – easy to do with a French Curve.

Changing the neckline of a wrap top/ dress is a bit more complex. Here’s a tutorial.
–
Neckline finish
You could simply finish the new neckline with a bias binding or a bias facing.
If you want the added structure of a proper facing, that involves a bit of easy pattern making.
See instructions for making a facing pattern about 3/4 of the way through this post.
Here’s a video from Louise Cutting on how to add a back neck facing to a pattern that hasn’t got one (facings do make collars very easy to sew on).
– – –
There’s a Craftsy class from Suzy Furrer on drafting necklines.
Again, many possibilities to think about and try out. But once you’ve decided what to do, the pattern work needed can be very simple.
– – –
Links available October 2016
= = = = =
To get to main blog, click on red header.
Explore posts in the same categories: pattern making for clothes
Have you any comments or suggestions ?