Archive for the ‘fit of clothes’ category

Blocks or Slopers ?

November 23, 2022

What do these words refer to ? This question came up in a discussion group I belong to. And for me it turned into a review of where our personal basic patterns come from. Thought I would put my comments here in case they encourage others in the same situation.

I don’t much use the terms block and sloper. I have worked my way through the drafting instructions in so many pattern making classes, books and software using ‘personal measurements’, which have never ended up with a basic pattern which even remotely resembled me. I did eventually have the sense to stop trying yet another of those methods in the hope it would at last be one that worked for me.
I found (see later) that it was something about the general principles of these methods which meant that they weren’t for me (especially the fit features which were included), not a limitation of the specific way the blocks were drafted. A naive beginner might assume there is a standard way of drafting pattern blocks, but actually each person who writes a textbook has a different method.

As we all have different body shapes, as well as different clothing styles and learning styles, we need to find our own way through the plethora of methods for attaining basic reference patterns which work for us. Meaning the patterns fit well, and provide a starting point for making the sort of garments we wear.

Perhaps there are different groups of us. Most pattern drafting and fitting methods work well for people who like fitted clothes, and have only one or two body features different from average. While I’m in a group who mainly wear casual clothes, and who have many differences from average.
Although I could now make fitted styles for myself if I wanted to, I find I don’t. Comfort and ease of movement are essentials for me. And though I have a good silhouette (with indented waist) from the front, from the side both bust and rear are flat and the only obvious features are my round shoulders and protruding stomach !

I talk in detail about the ‘issues’ I have with fit. But my solutions are just an example. It’s obvious from the comments below, and from sewing friends, that each of us who has big difficulties with fit has to find their own solution, which may be the opposite of mine 😀 While I have no use for them, other people have found it helpful to use software, tissue fitting, drafting (one specific method), a fitting scheme which ignores shoulders . . . Of course if you have a generous bust or rear, your fitting needs will not be the same as mine. So each of us has to do much exploring.

Combined in my case with the problem that my preferred learning style is to follow detailed instructions exactly when I first start learning, and give credit to the teacher as an expert. So I stayed for much longer than I should have with trying to follow pattern making and fit courses and books which didn’t work for me. Each expert is so enthusiastic about selling their method, and making big claims that it works for everyone. For a long time I assumed there was something wrong with me, not with the methods on offer.

Why don’t all these methods work for me ?

I had to do much work to understand why those methods didn’t work for me (much of it recorded in posts here). Most of the points in this section are about fit. There are many variations in fitting technique, also in what is fitted and in what order. And pattern drafting usually starts with making fitted bodice and skirt blocks. While I rarely wear closely fitted clothes, so those are not tools I need.

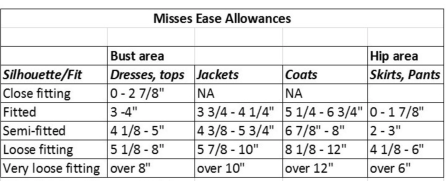
Nearly all pattern drafting methods divide your overall bust, waist and hip measures into 4 sections, and use this quarter measure for drafting the half-pattern block. I stopped following this idea after I measured my front and back separately for each of those 3 areas, and found that assumption is not true for me. I then converted those measures to BMV pattern sizes, and found I need 4 different pattern sizes in all (see this post).

There are several posts here on fit, in which I discuss the limits of fitting methods. Most pattern making and fitting sources include about 20 fit issues, which is about 1/4 of the 80+ issues that Liechty & Co describe. My fitting issues are mostly among the other 3/4. . . which the courses never mention, grrr. . .

I eventually gave away my copies of a famous series of fitting books, as they never answered any of my fitting questions. As an example of other sources, there’s a pattern company whose sewing courses I greatly enjoy, who have a course on fitting a bodice. There’s no mention at all about making a comfortable neckline or armhole-sleevehead, which are two of my biggest issues. (Liechty & Co is the only place I’ve found my armhole fit problems mentioned.)

I do think it’s irresponsible for people to claim that their fitting method works for everyone, when they include such a small proportion of what can be important. Though the claims can be very tempting. I would love to be able to use one of those pattern rulers, they claim to give a personalised fit and make the drafting process look so easy. But if you watch the video you’ll see that every curve is standardised, and nearly every dimension of the top is taken as related to the bust measure.

And as for that pattern company which claims their patterns fit everyone ! They did stop claiming that for a while after I wrote to complain, but I see they’ve started again. Here’s a post on why that is impossible. Though I’m surprised people need that explaining to them, you just need to look around to see how many different body shapes there are !

My main fitting issues (they get described as ‘issues’ only because they’re different from ‘average’!) are :
above the waist : neckline, shoulders, armhole, and relative length proportions,
below the waist : protruding high hips, deep crotch.
Instead of thinking of these as difficulties, even abnormalities, think of getting fit right for you as a special type of self-care 😀
It is amazing how well-fitted clothes can make you look as if you have a perfect body !

And many fitting methods deal with fitting issues in isolation, while if you improve the fit of one aspect of a garment, it usually worsens the fit of another. . . I did eventually learn to fit by ‘reading the wrinkles’ of a starter garment, which shows all the interactions. And you don’t need to know the cause to deal with the result. Using a complete fabric test garment. Combined with ‘slash the test garment and allow to spread’ when an area is too tight.
(Never ’tissue fitting’ a half-garment paper pattern, which is impossible without knowledgeable help.)

As I have sloping shoulders I need to start with fitting them so a garment hangs properly, while several fitting methods fit shoulders last.

Also most style advice for body shapes is stuck in the 50s, and aims at getting you to look more as if you have a balanced hourglass shape, rather than celebrating your good features. I’m a ‘pear’ shape, and would prefer to focus the viewer’s eye on my slim shoulders, not try to make my shoulders look as wide as my hips !

Another aspect of personal style : I usually enjoy using a computer, so assumed I would like pattern making software. But when I did at last find pattern making software which allowed me to alter shapes to my fit (Garment Designer), I found that for pattern making I am much happier working directly with paper and pencil, rather than entering numbers and moving points on a screen.

So how did I get my basic reference patterns, and what are they for ?

I do sometimes refer to my basic patterns as ‘blocks’, but they weren’t derived in the official way – by starting with some basic measurements and blank paper, and drafting. Though I have taken that rare thing, a class which drafts a starter block using only your personal measurements (from Brooks Ann Camper), instead of much of the time using ‘standard’ industry measures. Such as Suzy Furrer does at Craftsy (surely if commercial patterns don’t fit well, those standard measures are what we need to get away from). I stopped having any interest in Suzy Furrer’s block drafting classes when she told you to use an ‘industry standard’ measure which I already knew was wrong for me. Her classes on changing a basic block to make other styles can be more useful, as those methods apply to nearly any basic pattern, not just hers. Even with Brooks Ann’s course, after I had finished altering my muslin to fit, there was only one aspect of the result which was the same as the pattern I had drafted to start from. So the outcome of the fitting work is useful, the drafted ‘personal block’ wasn’t.

Although I have an indented waist I haven’t got much of a bust and don’t use fitted patterns much. So I don’t actually need what most pattern drafting classes start from. They start from drafting a fitted block and expand it to make casual patterns. It turned out to be much less work for me to start by fitting casual commercial patterns similar to what I was looking for. I’m a casual dresser who mostly wears loose to very loose fitting clothes, but even they look much better if they fit well.

Some of my basic reference patterns were derived from fitting a commercial pattern, and I label them by the source name.
This is the same as what people do when they develop TNTs – Tried ‘N True patterns. Those are not usually referred to as ‘blocks’, but they are in practice.

These are my successful patterns based on a specific starting point.
In each case, the main fitting issue was getting the shoulder slope/length-armhole-sleeve cap relation right. At that time there was little guidance available on that. Just recently Sew Sew Guild has offered a course.
fitted bodice and sleeves – fitted bodice from Brooks Ann Camper class, armhole and sleeve finalised in Judy Kessinger class.
raglan sleeve top – Sewing Workshop Trio (see post here).
drop shoulder loose fitting casual top – Cindy Taylor Oates Sew-Easy shirt (see post here).
very loose fitting ‘coat’ size – Burda (started as a men’s pyjamas pattern 😀 ).

My other base patterns developed through basic fitting work direct on my body, not from either drafting or from fitting someone else’s pattern.

cut-on sleeve top – started from a self-made sketch. I want a flared silhouette and all the 100s of commercial patterns are straight. (First test garment made in Pattern Ease.)
starting point
starting point

after fitting – shoulders and front neck depth copied from CTO so didn’t need work, this is the back, little change to the front.
after fitting

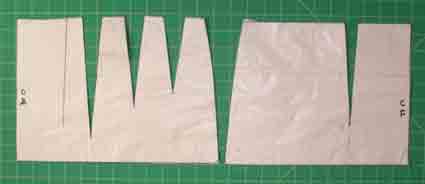
pants – the result of much work by me, e.g. side seam shape from direct draping on my body, crotch curve from using a bendy ruler – no commercial pattern looks anything like it (I have a protruding front and flat rear on a deep torso which slopes down from front to back).

Liechty & Co have more than 40 pages on the crotch curve, while some people who claim to advise on fit don’t even mention it. People who advise on pant fitting may have many photos/sketches of what can go wrong. I found using a bendy ruler very effective – instant good fit – amazing. And without having to try to understand what is wrong – I usually can’t identify myself among all the photos and diagrams.

Though there are many fit advisors who, if your crotch length is not average, just tell you to increase the crotch height, mentioning nothing about crotch extensions or curve shape. (Crotch extensions are the ‘horizontal’ sections that go under the body, see this post.) Most pattern drafting sources don’t mention crotch shape. Another issue is that some pattern grading methods use the same crotch extensions for all sizes – have they really not noticed the varying depth of larger bodies ! When I come across a pant pattern like that, I don’t waste any more time on it.

My lower body has much the same total circumference all the way down, from high hip to thigh. But actually my shape changes greatly between waist and knees. A few inches below my waist, there’s my protrusion at high hips. Moving down a few inches, this shifts forward to maximum protrusion of my stomach. Shifts down and back to maximum protrusion of my buttocks. Shifts down and sideways to maximum width of my thighs. It’s better just to use a constant measure straight shape down from high hips, not try to follow how these lumps move around. I do avoid wearing anything tight fitting !

waist to hip darts – used for both skirt and pants, developed by self-fitting on my body, with some help from Brooks Ann Camper. Back on left :
3 back darts

One pattern making book even forbids using the result I found I needed (3 back darts, to deal with my indented waist above high hip pads – she said you should never use more than 2 darts).

So this is yet another rant from me about pattern making and fitting classes which, despite their grand claims, only work well for people who are close to average.

Sadly those of us who are far from ‘average’ in our body shape need to do much work and exploration to find what we need to get a good fit. It may take years before you feel satisfied, but every little improvement is a help and an achievement. You have my sympathy ♥️

I have long been angry about personal pattern drafting classes which generate ‘blocks’/ ‘slopers’. But I am pleased that, after decades of struggle and upset from believing the claims of pattern making and fitting sources, I do know both which basic patterns I need and how to get them 😀

I still don’t know whether I should call these basic patterns ‘blocks’ or ‘slopers’. But I don’t much care – it’s having them that matters 😀

(2023 : I have recently read a book from the 1920s which says a ‘block’ is a basic pattern with stitching lines at the edges, no added seam allowances. Like the patterns used in Burda Style magazine, and in ‘couture’ sewing. This is the base pattern it’s easiest to start from when changing the style of a pattern. I don’t know if this meaning is still true – the terms ‘block’ and ‘sloper’ seem these days to be used quite loosely.)

Patterns can’t fit everyone

January 30, 2015

Many people complain that patterns don’t fit. But devising patterns that fit everyone is an impossible task.
We have problems with fit, not because pattern designers are doing something wrong, but because we each have a different body shape.

– – –

Our different shapes

There are some data from North Carolina State University, which I analysed in a couple of posts starting here.

They found :
About 1 in 8 of us has waist larger than hips, while about 3/8 of us have waist clearly smaller than hips, and the remaining half of us have no clearly defined waist.
About quarter of us are larger above the waist than below.
About quarter of us are larger below the waist than above.

How can anyone possibly design a pattern which fits all these people – except some sort of sack (add 2 triangular sacks for the half of us who are not rectangle shape ?), with belt supplied for people who want to show their waist.

And the research didn’t even look at fit issues like short-long waist, square-sloping shoulders, high round back.
Or any of the other 80+ fit issues mentioned by Liechty and Co. in Fitting and Pattern Alteration.
Here’s a list of common fit challenges.

My most obscure body shape element is that I have unusual armholes. Liechty and Co. is the only book I’ve found which tells me what to do about that.
We all have different preferred methods of fitting. I like ‘reading the wrinkles’. Sarah Veblen’s good book on this method, Complete photo guide to perfect fitting, has a section on fitting individual armholes. But she doesn’t mention the major pattern change I need to get a comfortable fitted armhole.

– – –

“Yay, this pattern fits me !”

It always annoys me when people enthuse that a pattern fits them out of the envelope, without saying anything about their body shape.
Suppose I recommend a pattern because it fits me marvellously. Should you rush to try that pattern ? Well, I have hips two sizes bigger than top, small bust, short waist, high hip shelf. If you have square shoulders, a generous bust, and slim straight hips, that pattern would cause you a lot of fitting work.

– – –

‘Average’ is best

Many RTW clothing companies use a ‘fit model’. They choose someone close to their idea of ‘average’, and make their clothes to fit that person. Yes, there are people who make their living by having clothes fitted to them. There aren’t all that many people who are close enough to ‘average’ US size 8/ UK size 12 to be eligible !

RTW companies use ‘average’ fit, because over the whole population, fewer people will be far from these measurements.

In the same way, the best that pattern designers can do for fit is to design for ‘average’.
(Unless they’re willing to target only a small part of the market.)
An ‘average’ shape pattern, statistically, though not for the individual, over all the people who use the pattern, will need the least fit adjustments.

– – –

Bad patterns ?

Of course there are bad patterns. In these days when cheerfully inexperienced people can sell terrible download patterns, we’re all aware that patterns need to be of professional quality. So they do have ‘average’ proportions, no mistakes, and all the pieces fit together properly in all sizes. And they have clear markings and instructions.

But patterns aren’t bad just because they don’t fit a specific person !

– – –

Learn to fit

I think pattern companies make a mistake by not making this fitting limitation clear. Then people are disappointed with their product, and don’t understand that disappointment is unavoidable.

Beginner sewers can be upset that their hand-sewn garments don’t fit them by magic, even though RTW doesn’t.
Few instructions for beginners mention that there’s a lot of learning to do with gaining fitting skills as well as sewing skills.

Yes, if you make your own clothes you can have beautifully fitting clothes. But only if you do the fitting work.

Well fitting clothes make you look as if you have a perfect body.
I once saw an exhibit about ‘couture’ which included dress forms for some people who were famous for being elegant. Oh dear, some of them were a mighty odd shape underneath.

So it is worth doing the fitting work !

There are several methods of improving fit. Such as taking measurements and altering the pattern. Or making a muslin and ‘reading the wrinkles’. Tissue fitting is often mentioned but is almost impossible to do without help. You may need to try several methods before you find the fitting method that works best for you. There are several Sewingplums posts about body shape and improving fit (2022 – the most recent is here).

Those of us who are further from average have to do more fitting work. It’s just something we have to accept as part of being us.

Good Luck to everyone who is far enough away from average that they have to do fitting work on all patterns. It’s inevitable for many of us !

= = = = =

Ease levels

October 12, 2013

After those voluminous architectural jackets, perhaps this is a good time to talk about ease levels !
Ease is the difference between the body measurement and the finished garment measurement at the point of interest. (Finished measures sometimes shown on the pattern envelope, usually on the tissue.)

For example, if your bust measures 36 in, and the finished garment measure at bust level is 38 in. then the bust level ease is :
38 – 36 = 2 in.

In practice the amount of ease is a surprisingly complex matter, as it depends on ease of movement, stretchiness of fabric, personal preferences, layering, and design.

This the Ease table (for non-stretch wovens) that used to be on the BMV site.
ease table

Some of us are not a RTW shape and have to buy garments which are huge in most places, just to be able to move without tearing the buttons off in our largest area. . .
Hopefully when we can make our own clothes, we can learn enough about fitting and pattern alteration to get round that problem.

– – –

Types of ease

Ease is not a simple matter of a few easy rules, as there are different types of ease for different purposes, as well as personal preferences to take into account.

There are 4 sorts of ease :

Negative ease

Garments made out of very stretchy fabrics, such as lycra leotards, may actually be made smaller than the body.
In these modern days of many stretch fabrics with different properties, pattern making books provide several different basic pattern blocks for fabrics with different amounts of stretch.

Movement ease

The minimum ease needed to be able to move.
For example, if you wore a skin tight garment in a non-stretch fabric, you wouldn’t be able to breathe.

The amount of movement ease needed depends on the amount of stretch in the fabric.
And people differ in their preferences.
Some people want to look sleek, and are happy to go without being able to move easily, to get the effect they want.
As in wearing a party dress which is too tight to sit down in. . .

In a close fitting jacket, with less than 2 inches of ease, you may not be able lift your arms easily above about 45 degrees.
So people who like freedom of movement often prefer 4 inches or more of ease in a jacket.
Most casual garments are made with more than minimum ease.

One of the problems with getting a good pants pattern is that they have both to look good while standing and feel comfortable when bending over or sitting.

There’s all sorts of specialist information available for particular sports, about the different areas of a garment where special ease is needed.

Layering ease

Here’s a diagram of the different levels of ease, adapted from the BMV table.

”ease-scale-sharpen”

This is an ease scale for non-stretch wovens.

CF . . . close fitting
F . . . . fitted
SF . . . semi-fitted
LF . . . loose fitted
VLF . . very loose fitting

Each level of ease assumes you want the garment to fit over the next one down : coat over jacket over blouse.
Though these days things are not quite so simple.

Jackets

The BMV ease table says jackets are not made close fitting.
But I know at least one pattern making book where the jackets are made from the same block as the dress.
Which means there’s not room for more than a camisole under, and minimum movement ease.
Say 2 in./ 5 cm. Perhaps less if the jacket is the focus of your outfit and always worn closed.

A jacket needs to be at least 1 inch larger than what it’s layered over, if it’s going to be worn as a layer over a blouse or shirt.
A lined jacket is often made 1 in. larger than an unlined one, for the same reason.
Then add at least 1 inch more, for each additional layer.

For layering a lined jacket over a sleeved shirt/ blouse, many people prefer at least 4 in / 10 cm. Especially in winter for more layering.

And also beware ease of sleeves. Fitted jacket pattern sleeves need to be checked. Many of them assume you’ll be wearing it over only a camisole or tank. So armhole and sleeve are not large enough to be worn comfortably over another garment with sleeves.

When you have a well-fitting jacket pattern, you may find you can wear a closer fit and still be comfortable. It’s a matter of personal preference and the usual clothes you wear a jacket over.
I need many layers for warmth, like to move easily, and am not close to a RTW shape, so most of my jackets are very loose fitting.

Coats

A bit bigger than jackets, as they’re usually designed to layer over a jacket.
The diagram has the coat ease levels BMV recommend for wearing over a jacket.

The BMV ease table says coats are not made close fitting.
But I have one coat pattern from them with ease of only 2 inches, obviously intended to be worn only over a top without a jacket.
So again, check finished measurements of a coat pattern to make sure you will be able to wear it in the way you expect.

Also the suggested ease levels assume the coat is worn over a jacket at the same level of fit.
For example, a fitted coat wouldn’t be comfortable over a very loose fitting jacket. There just wouldn’t be room inside the coat for all the extra fabric.

Design ease

The ease added by the designer to give the desired silhouette.
For example the 80s – 90s are famous for their huge shoulders and very loose fit.

For the last decade or so, fitted or close fitted has been the norm.
In recent seasons a ‘slouchy’ look has appeared – very loose fit has returned but without the huge shoulder pads supporting it.

– – –

Hip level ease

The main recommendations are for ease at bust level.

Hip level ease applies mainly for skirt, pants, shorts, culottes.
But also applies to the hip level of dresses, long jackets, coats.

On close fitted and fitted and semi-fitted styles, there’s often one inch less ease at hip level.
For example, if the bust level ease is 3 in. then the hip level ease is 2 in.

But allow for your personal needs.
For example, as my hips spread 4 inches when I sit down, I make sure there is at least that amount of ease at hip level.

On loose and very loose fitting styles, the finished garment measurements are often straight up-and-down. Hip level is often the same as the finished garment measure at the bust level.
But as the ease at bust level is more than 8 inches on these loose garments, that’s usually no great problem – unless your hips are 3 or more sizes larger than your bust.

– – –

This is all very dry. Ease is not a simple matter, but it is useful to understand how ease works and what your preferences are.

– – –

First written October 2013, link available September 2021

= = =

Pant patterns and body shape

August 24, 2013

3 years ago (!) I wrote a post on pant styles for different body shapes.
Which suggested patterns that help with pant fit.
Also one of my most popular posts is on adding wedges to pants patterns.
Since then, I’ve seen two more patterns which deal with different pants fit difficulties.

The fit issues I’ll mention are :
– long or short rise,
– deeply indented waist,
– midriff larger than hips,
– protruding stomach,
– large or flat butt, deep torso, large thighs.

– – –

Fit for Art Eureka pants

”eureka-butt”

Those aren’t 3 different styles, they’re 3 different rear sizes !

Pattern information here, with videos about fit.

The basic pattern has CB or side seam zip and tapered legs. Brief instructions for making other styles.
No instructions for inserting zip. Try this free Craftsy class on zips (not fly zips).

No pockets, so add your choice by copying across from another pattern.

The advantage of this pattern is it offers 3 different back pattern pieces for each size.

”eureka”

Basically, a pattern choice for people with a flat butt, an average butt, or a large butt.
The largest back also helps people like me who have a deep torso, or people with large thighs.

The patterns differ in :
– length of crotch extensions,
– angle of CB seam,
– shape of crotch curve.

This pattern doesn’t claim to be a quick and easy fix. You’re expected to make a test garment (perhaps several) marked with horizontal and vertical reference lines. Then adjust it according the instructions until the reference lines are horizontal and vertical on your body.

This is based on Sarah Veblen’s fitting ideas. She has a pants fitting class with pdfs and videos based on this pattern, at Pattern Review. Or get help from her direct, by video or e-mail and photos, contact information here.

– – –

Sure-Fit Designs Pants kit

Pattern information here

The SFD pattern uses waist, high hip, hip, and crotch length measurements.
Find the dots corresponding to those measurements on the master pattern, and join the dots to trace off your pattern shape.

”sfd-pant-grid”
(Sorry about the quality, this is a screen shot from an on-line video, not the pattern ! I have an earlier version of the pattern.)

Looks complex, but the grid is for finding your crotch length.

There’s DVD support for fitting, and for making a jeans pattern (closer fit).

And many support videos at the SFD Video Library
(scroll to about 2/3 down the page)

Sadly this pattern doesn’t work for me, even as a starting point for fitting tweaks.

My back is several sizes larger than my front.
Well, I could get round that by taking separate front and back measures, and drafting the Sure-Fit front and back to these different measurements.
(See my post on getting to know my sizes.)

Large or small waist

I also have a deeply indented waist. When such people buy RTW pants to fit our hips, we get spare fabric flapping around at the waist. We need more than minimal darts.

My large high hip pads mean I need 3 back darts for a good fit to the waist. Here is my ‘hip template’, back on left.

”hip-templates-web”

Perhaps I can’t complain about the Sure-Fit pattern only having one standard dart. Such an extreme waist-high hip difference is rarely mentioned by anyone. Some writers even rule against having that many darts that wide. I’ve only seen one example of a pattern like mine – one of the people in Lynda Maynard’s CD-book on De-mystifying fit.

In contrast, if your midriff is larger than your hips, the last thing you’re concerned about is adding more darts. In RTW, the best you can hope for is to find a company that designs for rectangle shape people, with waist similar to hips. Rather than for the ‘average’ person with waist smaller than hips.

Sure-Fit Designs do consider whether you’re bigger at mid-riff or hip. She talks about ‘heart’ and ‘diamond’ body shapes, rather than ‘apples’ and ‘pears’.
The master pattern includes both high hip and low hip measures. So if your high hip is larger, that can be represented.

(The only person with this body shape I’ve seen being fitted is in Lynda Maynard’s Sew the Perfect Fit class at Craftsy, though that’s for a skirt not pants.)

Deep body

The need for more than one waist dart isn’t my only problem with SFD pants.
SFD assumes that, if you have a long crotch measure, the extra length needs to be added to the rise.

While for people like me, with a deep torso because of deep pelvic bones or large butt, or large thighs which cause a similar issue – what we need is longer crotch extensions.

”3rects-web”

All these lines are the same total length.
Think of them as a simple diagram of a vertical cross section through your lower torso mid-line from front to back. Which is most like you ?

This shows that just knowing the crotch length measure alone is not enough. You also need to know where that length is.
Are you longer or shorter than average from waist to crotch – are RTW pants always too long or too short for you here ?
Or are you longer or shorter than average from front to back :
– Do RTW pants collapse at the back ?
– Or give you big ‘smiles’ – fabric pull lines pointing to the crotch ?
– Or just plain feel uncomfortable and cut into your crotch, especially when you sit down ?
– Or do your pants pull down an inch or more at the back when you sit down ?
Big thighs also mean you need more fabric between your legs.

The Eureka pattern deals with this depth issue directly.

Unlike the Eureka pattern, all SFD patterns have the same crotch curve shape and CB seam angle. And all SFD patterns with the same hip measurement have the same crotch extensions.

However, Sure-Fit pants do solve fitting problems for many other body shapes.

(P.S. Since getting interested in this, I’ve noticed that many commercial patterns have the same length of crotch extensions for all sizes from XS to XL. Surely not ! It seems unlikely that the depth of body stays the same whatever someone’s size.)

– – –

Add princess seams

If your main fit issue is a protruding stomach, start by letting out the CF and side seams. If that doesn’t give a good result, add princess seams to the front pattern piece. They give lots of opportunities for adding extra fabric in this area !

”stomach

This is supposed to be a horizontal cross section of either your lower front or back, such as the view looking down at your tum.

Shaping seams or main darts are usually best placed about where your body stops being sort-of straight across and starts to bend back to your sides.

Quite easy to add these seams.
– Feel your body to find where the biggest ‘bend’ comes in your shape around.
– Measure how far sideways this is from Centre Front.
– Draw a line down your front pattern piece, this distance from CF and parallel to the grain line.
– Separate the two pattern parts and add seam allowances.

Make up your test pants with wide seam allowances here, so you can try out how much to add. 1 in./2.5 cm on each new seam edge adds 4 in./10 cm to the total width. Like people with large midriff all round, you may need to compromise about how much extra fabric you have to allow over your hips and thighs to deal with the transition from large mid-section to thin legs.

(P.S. here’s a post from Colette Patterns with another method for abdomen adjustments.)

If you have a large rear, you could try adding princess seams to your back pattern. There may be some combination of shaped princess seams and longer crotch extensions which gives you the best result.

– – –

Which pattern for which fit issue ? – summary

If you have difficulties with a long or short rise, you could try the Sure-Fit Designs approach.

While if you have a flat or large butt, deep torso or large thighs, the Eureka pants may help.

Both ? I would start from the Eureka pants, as adding or removing rise is just a matter of lengthening or shortening the pattern between waist and hip. Much easier than changing the crotch extensions and crotch curve shape and angle.

Heavily indented waist : Eureka pants could be best at dealing with this. As the dart positions, numbers and sizes are fitted directly on the body, rather than being supplied by the pattern.

Though it is a bit of a fiddle to do this on yourself. I used a mixed approach, made some guesstimates about dart position by feeling my shape, and about numbers and sizes by comparing my waist and hip measures. Drafted a trial pattern, then improved the details using a test fit.

Midriff larger than hips : Sure-Fit Designs patterns include an explicit measure of the midriff area.

If you have a protruding stomach, try adding front princess seams.

(P.S. 2016 : Sure Fit Designs now has a section of free pant fitting videos which cover many of these issues.)

Whichever pattern may be best for dealing with your fit issues, SFD is the company to go to for instructions on altering your basic pant pattern to make everything from palazzo pants to jeans, yoga pants, leggings, shorts, capris. . . These instructions apply to any basic pant pattern, not just to patterns produced by their system.

Might either of these patterns help you towards the perfect pant fit which is at the end of the rainbow 😀

– – –

Patterns and links available August 2013

= = =