Archive for November 2011

Getting to know my sizes

November 26, 2011

Many surprises when I started exploring pattern blocks earlier in the year. One was that many methods of drafting patterns to individual measurements assign half your bust/ waist/ hip measure to front and half to back. Surely not, I thought. And indeed it isn’t true for me.

Some pattern making books do include front-back differences. I’m using :
Knowles. Pattern making for fashion designers : juniors, misses, and women.
Allemong. European cut.
Liechty, Rasband, Pottberg-Steineckert. Fitting and pattern alteration (hurrah, my birthday present this year).

– – –

Taking my measurements from waist to thigh

Wearing leggings and tank, I rigged myself up with :
– horizontal velcro tapes at waist, high hip, hip.
– vertical tapes at CF, side seam, and CB.

Needed to adjust the position of the side tapes so they :
– looked from the front as if they were at the edge of my body.
– looked from the side as if they roughy divided the area of the body in half.

No photos – I haven’t got a leotard, so it was all rather untidy !

I don’t attempt to measure to an accuracy of 1/16 inch or 1 mm, as BML tells you to. Impossible accuracy with a soft flexible body. It’s easy to change the measure much more by a slight change in tension of the tape measure or posture of the person being measured.

I know 1/8 inch can make a difference to the quality of fit. But that’s in fabric being tried on. I aim for measures to the nearest 1/4 inch/ 0.5 cm. Details to be adjusted on the ‘muslin’.

– – –

The results

My total waist measure is 33-1/2 in., total hip 43-1/2 in.
Both Big4 pattern size 18.
Apparently no problem there then.

But look at the details and a very different picture emerges :
. . . . . . . . . front . . . . back . . . . total (inches)
waist . . . . 19 . . . . . . . 14-1/2 . . 33-1/2
high hip. . 20-1/2 . . . 21 . . . . . . 41-1/2
hip . . . . . . 20-1/2 . . . 23 . . . . . .43-1/2

(Sitting hip 46 in., important to know for ease allowance.)

Interesting, I still have a waist at the back, but there’s all that stomach sticking out in front. Yes, it does go in and out daily.
And my high hips are important, so :
– darts below waist need to be short, and mainly at the back.
– below high hip there’s little change.
My high hips are about 3-4 inches below my waist. But as I have a tilted waist (higher at back due to high hip pads), a level high hip is not the same distance below my natural waist all the way round.

Double those measures – so these are just imaginary numbers, assuming my back and front are the same :
. . . . . . . . front . . . back (inches)
waist . . . . . 38 . . . 29
high hip . . . 41 . . . 42
hip. . . . . . . . 41 . . . 46

Comparing those numbers with the BMV size table, that means my pattern size is/ are. . . (I’ve added bust here, I knew this before.)

. . . . . front . . . . back
bust . . . . 14 . . . . 16
waist . . . 24 . . . . 14
hip . . . . . 16 . . . . 22

Eeek ! no wonder I’ve never been able to wear a sheath dress or a leotard 😀

I’ve still got an indented waist in silhouette from the front, but have difficulty fitting it. Easiest with a waist seam, which isn’t usual in a blouse. I’m sure it is possible to get princess seams to fit me well at the back, but I haven’t got round to it.

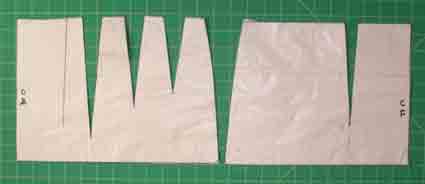
Here’s my personal waist-to-hip pattern which shows the different front (right) and back shapes.

”hip-templates-web”

These measures helped me understand much, but they don’t give the complete picture. My front waist and hip measures may be similar, but I’m not the same shape all the way down – forward spreading waist becomes hips spreading sideways. Visually, my widest hip is lower in my silhouette from the front than it is in my silhouette from the side. And unlike my stomach, that large back is just generally large, not protruding.

Don’t even try to imagine what I look like in a RTW fitted jacket !
Though I do promise I have never bought one 😀

Some people need front bigger than back below the waist. Sandra Betzina ‘No Time to Sew’ p.15 says she cuts a size 14 pants front and size 10 back.

Above the waist, I have small bust and wide back. Many people have larger upper front than back. FBAs need to be adjusted for personal shape and ease preference. See my post on the FBA for some comments.

– – –

Other special features of my shape

Here are some other features of my body, as described by Liechty et al.

Short lower rib cage/ high waist.
short between armhole and waist

High neck base.
similar to sloping shoulders but I think this is more ‘me’.

Forward head.
raise back neckline, lower front neckline

Shallow chest.

Low bust position.

Rounded upper back.
Shoulder darts essential

Cylindrical upper torso.
Scoop out armholes sideways. I haven’t got large biceps but do need a large armhole. I’ve learned to check cut-on sleeves to make sure they’re not tight.

Larger elbows.
Don’t know if my bones are large, but I do like to be comfortable when I bend my arms.

Longer lower torso.

Cylindrical lower torso.
long crotch shelf/ extensions on pants

Here’s some things which affect style rather than fit :
– I’ve recently realised my forward head has made my neck go visually from long to short.
– lumpy knees (hereditary) and thick ankles.
I have got good features too 😀

– – –

Implications

No I don’t look like a freak.
But RTW doesn’t look good !

And, with so many non-average features, no wonder I find it easier to get good fit by starting from my personal pattern block and adding style elements to it. Rather than starting from a commercial pattern and making all these changes.

I don’t think all this self awareness gets you out of making a trial garment. Even when you’ve gone through the pattern-muslin-pattern-muslin cycle several times and have a good fit, it’s best to check that length, ease, and style elements such as collar shape, pocket placement, etc. are flattering.

Also best fitting method depends on personal preference. I don’t at all enjoy tissue fitting. I prefer working direct with a muslin, ‘reading the wrinkles’. Rather than trying to get all the adjustments done accurately to the pattern before ever trying something on.

But many people love ‘Fit for Real People’, and tissue fitting, and not having to make a muslin. So try different methods to find what you prefer. Every little step is an improvement 😀

– – –

P.S. There have been so many comments about this, perhaps I’d better add some more :

I’d like to to encourage people who have unusual fitting challenges. Of course it’s marvellous if you find commercial patterns which are close to your body shape, or a fitting aid which works for you. But there are people who have too many features away from average for that to be possible. And many of those special features aren’t dealt with in the pattern making books which claim to tell you how to draft a personalised pattern.

I’m not so analytic about all this when I do the actual fitting. I fit by ‘reading the wrinkles’ on a muslin. I make no attempt to resolve all my fitting issues one by one on the pattern before cutting out.

Though there are many fitting issues which need a rough change to the pattern before cutting the fabric, or there won’t be enough fabric available to make the detailed adjustments. (Though if you make a muslin, you can slash and spread on the body to add the wedges of fabric needed.) Such as a long body, or square shoulders, or a large bust cup, or protruding front and rear when fitting pants. Or different sizes front and back, above and below.

And I am the sort of person who likes to understand what I’m doing. For example, I need a personalised armhole to be comfortable. Liechty et al is the only book I know which explains what it is about my body which makes this necessary, and what to do about it.

– – –

Patterns and links available November 2011

= = =

‘Multi-block’ patterns

November 19, 2011

Most patterns with different styles make variations on the same main pattern pieces, such as changing length, collar, trim, perhaps sleeve shape in the same armhole. There are many examples in my posts on new patterns this autumn, in businesslike and casual styles.

What I’m talking about here is styles so different in shape that they need different main pattern pieces. These basic pattern pieces are called ‘blocks’.

I’m not talking about wardrobe patterns – obviously those include top/ jacket/ pants blocks, etc.

What features would you like in your collection of basic patterns ?
– armhole : fitted, drop shoulder, raglan, cut on sleeve.
– body shaping : darted, shoulder princess, armhole princess, side panel, wrap, casual-dartless either straight or flared.
– knits, wovens.
– amount of ease : close fitted, fitted, semi-fitted, loose fitting, very loose fitting.

– – –

Jackets and coats

Simplicity 1943 boleros are all dartless, but have different sleeves and body shapes. One (right) has cut on sleeves. The others have set in sleeves with different bodies : one with flared body and flared sleeves, one with straight body and gathered sleeve cap. Simply lengthen these to get many more styles.

”s1943”

Simplicity 2154 has two dartless block jackets with different sleeves. One is set in, the other has a cut-on upper sleeve with side panel below.

”s2154”

Simplicity 2208 is for fleece jackets. A dartless flared jacket with slightly dropped shoulder sleeve and either a drape front or big collar. And a raglan princess hoodie.

”s2208”

Simplicity 2150 is for jackets and coats. Two jackets based on the same princess block with different centre front panels. And two dartless styles – jacket size with set in sleeve, or coat size with cut on sleeve.

”s2150”

Simplicity 2285 has two raglan sleeve styles, a jacket and cape. Also a princess jacket with set in sleeves, and a dartless vest.

”s2285”

– – –

Tops

There are many top patterns with ingenious variations in collars, cuffs, lengths, trims etc. But few include different blocks.

Butterick 3030 is for easy dartless tops with raglan, cut-on, and dropped shoulder sleeves.

”b3030”

Butterick 5526 is for classic shirts, with dartless and fitted princess bodies.

”b5526”

Simplicity 1945 is a wardrobe for knits by Khaliah Ali. A raglan sleeve top with cowl neck, and a set in sleeve top with side drape front. Plus a simple jacket with cut on sleeve and cascade front. (Pattern also has simple soft skirt and pants.)

”s1945-2”

– – –

Skirts

There are several skirt patterns which include both straight and a-line skirts. And 4, 6 and 8 gore skirts. Those may be the first things you learn if you take a pattern making course.

McCall’s 6402 is more interesting, with shaped seam, pleated, and drape front styles. Girly at this length. Make it longer if you prefer !

”m6402”

– – –

Pants

There are several pant patterns with both loose and close fitting styles, which have a different cut. A couple of examples :

Butterick 5502 has both leggings and elastic waist pants.

”b5502”

McCall’s 6403 has both straight and fuller leg styles.

”m6403”

– – –

Sorry I haven’t found any dresses ! Doesn’t mean there aren’t any, but they do have much bigger pattern pieces so perhaps are less likely.

Do any of these block collections meet all your styling needs 😀

– – –

Patterns and links available December 2011

= = =

Nancy Nix-Rice’s wardrobe plan : more thoughts

November 12, 2011

Nancy Nix-Rice gives us the simplest guide to a co-ordinated wardrobe. Of course when we know our own colour preferences, which garments we wear most of the time, and our personal style, we can make our own choices. And still take inspiration from Nancy’s ideas.

Here’s a summary of her 12-item basic wardrobe (making nearly 100 outfits). She uses three solid colours: darker and lighter neutrals plus an accent. And a print with all three colours.
– 4 under-layers, in each of the 3 solid colours and the print.
– 3 over-layers, in each of the 3 solid colours.
– 2 pants, in each of the solid neutrals.
– 3 skirts, in each of the neutrals and the print.

Nancy chooses simple classics, essentially only 6 styles with slight variations :
– knit sweater set.
– woven sleeveless shell.
– woven notched-collar jacket with short or long sleeves.
– woven pleated skirt and classic pants.
So to mimic her plan, we only need a small group of patterns.

If the details of Nancy’s plan are not right for you, what are the general principles ?

– – –

What are your core garment types ?

Are your core wardrobe needs a top, jacket, skirt, pants, as in Nancy’s examples ? Butterick 5333 is one of many possible wardrobe patterns.

”b5333”

Or perhaps you usually wear top, skirt, dress, jacket. Here’s one example, Butterick 5147.

”b5247”

I wear multiple layers : shirt/ blouse, tunic, vest, casual jacket, pants. Simple versions of my basics might be :

”my-five”

Textile Studio Mandarin shirt 1213,
Butterick 5390 tunic,
Simplicity 2285 vest (I picked this one because I’m working on it for Kenneth King’s faux-fur class at Pattern Review – recommended),
and Butterick 5429 jacket and pants.

I do own a couple of skirts, but they’re not part of my everyday wardrobe. I can remember my last dress, which went to the charity shop 15 years ago.

Perhaps you wear a simple threesome : knit top/ tee, jeans/ casual pants, cardigan/ casual jacket. Or white shirt, blue jeans, navy blazer.

What are your most frequently worn garments ? see my personal wardrobe plan post.

– – –

What are your go-to styles for your core garment types ?

How about Nancy’s core components but in a different style ? Eileen Fisher’s ‘system’ also consists of over- and under-layers, skirt, pants, but in ‘Easy Luxe’ casuals (see my posts on her capsules under Wardrobe Plan in the index).

”
Eileen Fisher winter 2010-11

Or perhaps you prefer a softer frillier ‘girly’ version of the dresses wardrobe.

I listed a few style options for tops, skirts, pants in my first of these posts about Nancy’s suggested wardrobe.

A blazer has been the key over-layer in recent seasons. There’s currently a good video on styling a blazer at Jones New York. But your favourite over-layer may not be a blazer. I always reach for a shirt-jacket. What is your go-to outer layer ? Here are some options :
Woven or knit ?
Fitted, loose, over-sized ? Length ?
Straight, flared ? curves, angles ?
Soft, crisp ? unstructured, structured ?
Lined, un-lined ?
Dropped shoulders, fitted armhole, raglan, cut-on sleeves ?
Front closure : buttons, snaps, zip, hidden placket opening, wrap ties, up to the neck or lower ?
Simple, or extra style elements such as a yoke, or princess seams, or jeans jacket seams, gathers, ruffles, twists ?
Collar or collarless ?
Collar : notched, mandarin, funnel, convertible, shirt band, shawl, hood ?
Pockets ? what style ? where ?
or perhaps you prefer a wrap, shawl, or cape ? (even though they’re not wearable without under-layer as Nancy’s scheme requires).

More ideas for variations on one of the cores ? see my recent personal styles post.

– – –

Possible co-ordinated patterns

Are there easy routes to co-ordinated patterns, if classics aren’t for you ?

The designers who produce a small set of basic patterns choose similar styles to Nancy’s group. See Nancy Erickson and Cecelia Podolak. Nancy Erickson has booklets on altering her basic patterns to make dozens of other styles.

Making the simplest versions of your core wardrobe could be a good starting point for your own pattern drafting. If you haven’t got many fit issues, simplify the fitting stage using a fitting aid – see my post on easier fitting shells.

Co-ordination may be easier if items come from the same designer. Many pattern designers include simple basics in their range. Such as Palmer-Pletsch and Nancy Zieman at McCall’s, or Connie Crawford at Butterick.

Among independents with a good group of basics, there’s Louise Cutting, Dana Marie, Loes Hinse (also recent patterns), Saf-T Pockets, Silhouette Patterns. And Jalie or Christine Jonson for knits.

There are more comments, plus descriptions of some wardrobe pattern books, in my post on reducing the number of shapes. Wardrobe patterns are the easiest way to co-ordinate. Among the Big4, Simplicity-New Look has the widest variety of styles.

– – –

Do you prefer more or less variety in colour, fabric, style ?

What are your most flattering colours ? I said a bit about colour in my first post of this group.

Nancy Nix-Rice’s wardrobe is based on neutrals. Here’s a video by Imogen Lamport on choosing neutrals. About 60 % of the clothes Nancy suggests are in neutral colours, about 40 % have accent colours. But of course you can choose your own proportions. Do you love or hate wearing neutrals ! Would you like no accent colour ? all colour 😀 I wear neutrals with occasional accent colours. You may instead want lots of bright colours.

Nancy has groups of garments all in exactly the same colour. I wouldn’t be comfortable with this. I prefer to wear a range of tonal variations around a main colour.

What are your favourite fabrics ? I usually wear textures for added interest (especially sweater knits), rather than prints. Sequins, shine, leather, fake fur are current for garments or trims. (P.S. There’s a fascinating new newsletter from Nancy on personal texture. There’s no way of getting my hair to look smooth and sleek 😀 )

Do you like many different styles, and a wide variety of looks ? Nancy Nix-Rice repeats very similar styles in her 23 garment selections. I may not have the same core wardrobe items as Nancy’s choice, but I do wear simple repeated styles. A big long scarf is an easy way of looking current. You may want much more variety or complexity!

– – –

Getting it all together

Despite all the differences, I’ve done so much wardrobe pondering before this that I found it quite easy to relate my own preferences to Nancy’s scheme. Hey, I already have most of them, or on a list of planned clothes purchases and fabric buys 😀

This season, getting a basic set of TNTs is the theme of the Stitcher’s Guild Sewing With A Plan for 2012. A core of neutrals plus a coloured twinset is the basis of the winter 6-PAC devised by ejvc for this year. We’re all working on getting our wardrobe basics right 😀

You Look Fab has an interesting modern take on the twin set – a woven blouse and knit cardigan in the same colour.

Sort out your TNTs or personal blocks, pick a few patterns from your favourite designer, or one wardrobe pattern for wovens and one for knits. Select your three colours and four or five fabrics. Whoosh around the accessory shops. And off you go into integrated wardrobe heaven 😀

Or for something completely different, how about a core wardrobe of just 1 item! Look at The Uniform Project :
1 dress 365 ways
(see View by Month for all the photos). Notice she chose a multi-function basic garment : it can be dress/ tunic/ under- or over-layer.
(Hint : you do need a lot of interesting extras 😀 )

– – –

Patterns and links available November 2011

– – –

Other posts on Nancy Nix-Rice’s wardrobe plan :
Neutral Cores, colours, personalising
Accent colour and print
Extras
Accessories
And related post :
Two-piece dresses

= = =

‘Fit to Flatter’ by Amy Herzog

November 5, 2011

October 2016. Amy Hertzog’s on-line tutorials are no longer available. She now has a book, Knit to Flatter, and a Craftsy class, also Knit to Flatter. She gives much detail about hand knitting, but the general ideas apply to all garments. This post has some comments on applying the ideas to dressmaking patterns.

Amy Herzog’s tutorials are a marvellous series about the style elements that flatter and don’t flatter different body shapes. And how to make fit changes.

It’s for knitters, but most is relevant to dressmakers. We have similar basic problems :

– We can’t try something on until it’s partly finished. So how do we know beforehand that we aren’t wasting our time, effort, money, and beautiful materials on making something that looks marvellous on the model and dreadful on us ?

– Most of us have body features that are not ‘average’. How can we alter an ‘average’ pattern so it fits us better ? This is actually easier for dressmakers – we just have to alter the paper pattern. We don’t have to calculate the details of stitches and rows.

In this series there are excellent photos of real people wearing right and wrong shapes (generous of them to show that). Especially tops and casual jackets. The examples are hand knits, but the advice about styling and shaping applies to any clothing, made or bought.
So read “dressmaker” instead of ‘knitter’ and “top” instead of ’sweater’.

Full of ideas and inspiration 😀

– – –

1. Introduction

2. Shapes
Types of body shape and suggestions about what flatters them.

3. Mindful project choice
Starting from body shape and showing what styles do and don’t look good.
Also starting from patterns and suggesting body shapes they look good on.

4. Sweaters [tops] and you
Use photos to identify your body shape.
Take interesting measurements.
Some comments on easier and more difficult pattern changes.

5. Necklines
Advice on necklines that flatter different body shapes.
Instructions for changing width and depth of neckline in knitting patterns.

(Knit stitches are not square, which adds complications. This is why she mentions ’knitters graph paper’. There are web sites where you can enter the number of stitches and rows to the inch/ 10 cm for your knitting yarn. The site produces graph paper with those proportions. You draw your required shape, with the natural proportions, on the graph paper. And use that to count how many stitches and rows you need to knit the shape.)

For suggestions about changing necklines in dressmaking patterns, see my necklines post.

6. Sleeves
Flattering length, width, and shape of sleeves.
Again the instructions section is about knitting.

For dressmaking patterns, it’s usually easy to change sleeve length.
To change sleeve width or shape which involves changing the armhole, it’s easiest to substitute the sleeve from another pattern. Match up the centre lines and shoulder seams of the 2 patterns and trace the armhole across. If you use the correct armhole for it, you won’t need to change the new sleeve.
If you want a wider sleeve without changing the armhole, most fit books tell you how to alter sleeve biceps width without altering the sleeve cap length. Or simply use a larger size sleeve from the same pattern, with the armhole to match.
Brensan Studios Shirt Club are patterns you can swop sleeve styles between as they have the same armhole.

7. Length
Where best to put the horizontal lines on your body.
When she says to use ’short rows’ if you have a tummy, she means add a downward curve to the centre front hem.
The section on pattern modifications uses measurements of the lengths of your body sections (taken in Section 4). So it applies to dressmakers as well as knitters. Guidance about where you need shaping darts.
For me it’s important to know about my high hips (circumference, and distance below waist) as well.

8. Shaping
Where you need darts, and how large to make them. Advice that’s the same for dressmakers. Good on shaping for the back – I recognise myself here.

When she tells a knitter to use short rows, it’s a way of adding length at the centre of a garment piece without changing the length of the side seams. Dressmakers achieve the same result by adding horizontal darts from the side seams.
Do you know how to add darts to a dressmaking pattern? It’s often easier than in knitting. Perhaps easiest to learn by experimenting with a trial garment to find what works for you.

She thinks we all look best with waist shaping in our clothes. Yes, in an ideal world. But in winter I wear so many layers that looking more shapely than a box really isn’t an option 😀

9. Implementation
Making your custom styled top pattern.
Choosing the best style elements for you from all the previous sections : this is the same process whatever the source of your clothes – knitting, sewing, RTW.
The measurements section is also relevant to dressmakers. Though do add bigger ease levels if your pattern is for woven rather than knit fabrics.

There’s a section for knitters on doing the pattern calculations. This is the only section in the whole series where there’s not much for dressmakers.
For dressmakers it’s the usual strategy :
– develop well fitting personal basic pattern blocks, or learn what changes you need to make to commercial patterns.
– learn how to transfer style elements from one pattern onto another.

10. Conclusions
Review, plus ideas on how to use favourite style elements from any pattern in a way that’s best for you.

(Ravelry is a huge site for knitters. Somewhat akin to Pattern Review.)

– – –

Amy mentions light/ dark colours but otherwise says little about colour, which for me is very important in getting a flattering result. But there are many interesting tips and helpful comments in all this. You do sometimes have to make an effort not to be distracted by details about knitting. But the general principles are the same for all clothes makers. Recommended 😀

All the recent wardrobe planning reminded me how much I like sweater knits. But the simplest sweater patterns are basic rectangles, which are not good on my pear shape. So this Fit to Flatter series is just what I need.

It is very relevant to choosing flattering style elements for anyone. And for making appropriate pattern alterations in dressmaking as well.

– – –

Links available November 2011

= = =