Archive for November 2010

Types of weaving/ types of loom 3 : yarn heddles, cards

November 27, 2010

The advantage of doing each under and over weaving move separately is you have complete freedom about the texture and colour of patterns you make. But it’s very slow as each over and under is done by hand. Explains why tapestries and tufted rugs take a long time to make and are very expensive.

(Previous posts in this group :
1. simplest weaving
2. frame looms)

Next step – big advance in technology – devise a way of holding the warp threads so the weft thread can go all the way across in one pass.
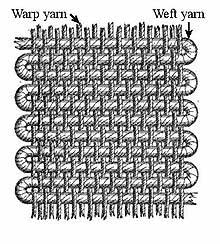
”weaving-wiki” Wikipedia

This is ‘plain’ weave, often called ‘tabby’.

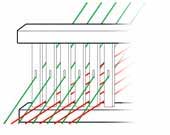
To make this simple weave, you need a way to hold alternate warp threads up, so there’s a gap between them and the others. Then you can pass the weft through the gap between them.
”shed-rigid”
picture source

This triangle shaped gap bewteen the warps is called the ‘shed’. (So a weaving shed is not necessarily the building the loom is in. . .)

The devices holding the warp threads are called ‘heddles’ (the drawing shows a ‘rigid heddle’, there are other types).

Then you need a way of swopping the warp threads round, so that the ones which were up are now down, and vice versa.

And you need a way of supporting the weft yarn so it’s easy to ‘throw’ it through the shed. That’s done by winding the weft yarn onto a shuttle.

This post is about the simplest methods of holding warp threads. Again it’s possible to use simple methods to make complex patterns. But it’s still a relatively slow process. For “better“ ways of speeding up see the final paragraph. Better in the sense of quicker to make cloth, but it may be more difficult to make complex patterns.

I’ve picked out a few videos and books on these simple looms. You can find a huge amount of information and advice on-line, and people who supply all sorts of gizmos and yarns.

– – –

Shed stick, yarn heddle, heddle stick/ harness.

Set up your frame loom with warp threads.

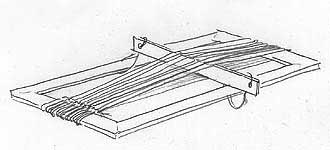
Cut a ‘shed stick’ from cardboard, longer than the width of the warp threads, and 1 to 1-1/2 inches (3 – 4 cm) wide.

Thread this over and under the warp threads.

Turn it on it’s edge, and you have made a ‘shed’ gap which you can pass a shuttle of weft yarn through.
”mm-shed-stick”
picture source

Ah, but how to get back the other way, when you need the other warps raised to make the ‘shed’ the other way round.

Well, before starting the weaving, lay the shed stick flat.
Cut lengths of yarn, about 10 inch/ 25 cm.
Tie one of these leash or ‘heddle’ strands round each of the warp threads not lifted by the shed stick.
Loop the string heddles round a ‘heddle stick’, also called a ‘harness’.
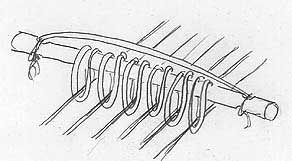
”mm-string-heddles”
picture source

To weave, turn the shed stick on edge to make the shed, and pass the shuttle through.
Then lay the shed stick flat, and use the heddle stick to pull up the other warp threads, so you can pass the weft thread under them in the other direction.

These diagrams come from an excellent article with all the details.

Another way of working is to have yarn heddles on all the warp yarns (no shed stick). Then you can lift up the warp threads individually or in groups, whichever you like.

In this video the weaver uses sticks to pick up the warps she wants to use. Then when all the heddles are made, she ties them together into 3 groups, for the 3 different lines of the weaving pattern. When you have a separate heddle on each warp strand and use them individually, things can get quite complex and ingenious !

– – –

Longer warps

Those looms set up the warp threads on a frame, which limits the size of the area you can weave. How to get longer warps ?
– tie one end round your waist and the other round your toes.
– tie one end round your waist and the other round a tree.
This is the next big step in weaving technology.

There are many varieties of this sort of loom, thought up by different cultures. Have a good search if you’re interested. There are DVDs on ethnic weaving methods, general surveys and individual studies. And ‘The Book of Looms’, which is about weaving traditions around the World.

If you’d like to try one of these, here’s an excellent source on making and using a backstrap loom.

And here’s some of what she makes :

”backstrap”
Handwoven magazine November 2010 page 18

Excellent examples of the complex patterns you can make when you control individual heddles, slow but effective.

Those looms are very portable. But I’m just going to talk about looms that are not attached to the weaver !

– – –

Inkle loom

On an Inkle loom, the warps are wound round a frame, which sets the length of warp. Inkle looms make 2 or 4 inch (5 or 10 cm) width strips, so they’re good for making flat braid with a firm weave.
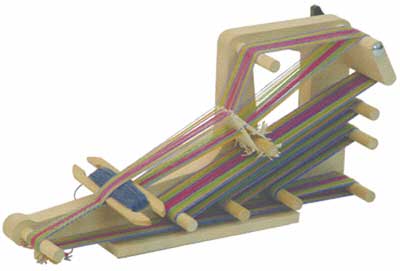
”ashford-inkle”
picture source (weaving looms, page 2)

Here’s a good video showing how to use this sort of loom. Yarn heddles (lightest colour in the photo) hold alternate warp threads in a fixed position, and the other warp threads are moved above or below them by hand.

Excellent for making firm braid, and no shortage of things to do with it :
sadly site on 75 things to do with braids no longer (2018) exists.

book : Inkle Weaving by Helene Bress (2018 – oop)

– – –

Card weaving
Tablet weaving

Inkle looms can basically only make the simplest plain weave.

But there are ways of leading the warp yarns through holes in cards. The ways the cards are threaded, and then how the cards are turned during weaving, make different weave patterns.
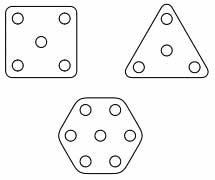
”tablet-shapes” Wikipedia

Here’s a video example of card weaving

I can see why people find this fascinating, but I don’t think I would find it restful to do ! No doubt it gets easier with practice.

Much loved by Viking and mediaeval re-enactors, so people tend to make their own looms. . . You can buy ready made cards (also called tablets). And you can buy looms. Here is one :
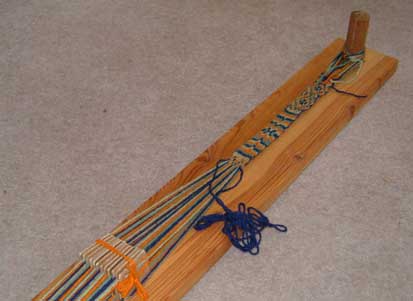
”tabletboard-sm”
picture source (Board for Tablet/ Card weaving)

This loom is 2 yards (1.8 m) long – no problems with warping up !

Using cards on an inkle loom is called tablet weaving.

book : ‘Card Weaving’ by Candace Crockett

– – –

No shortage of fun ways of weaving without making an investment in the complex mechanisms of a big loom.

– – –

P.S. here’s a very basic ‘loom’ for card weaving.

And here’s a simple piece on a backstrap loom.

– – –

Links and videos available November 2010

– – –

Note in 2013 : I was going to write a final piece in this group, about rigid heddle weaving and floor looms. But it isn’t necessary – there’s no shortage of internet advice on them.

They’re both ‘beam’ looms, a technical advance which allows you to make a long length of cloth (the warps are wound onto the beam).

The difference between the two is in the heddles.

Many weaving sources which claim to be complete actually only mention floor looms.

A ‘rigid heddle’ moves all alternate warp threads together. Weaving with one of these is often dismissed as not ‘real weaving’. But it’s a good type of weaving to have as a hobby. A fun way of learning the basics. Interesting in its own right as you can make (slowly) many textures. You can weave wide enough fabric to use for making clothes, though rigid heddle looms big enough for that are quite large.

Floor looms have another technical advance – each warp is in an individual heddle, which is held in a frame called a ‘shaft’. Any floor loom is quite large (I knew someone who had one made from tree trunks – you need a barn for those). But there are smaller looms called ‘table looms’ which use the same shaft mechanism. The heddles are threaded in groups – each group in its own shaft. An easy way of making some though not all textures/patterns. The more shafts the loom has, the more textures you can make. And the more difficult it is to learn. Another advance which has high pay-offs in the ease of doing some things, but other things become impossible (compared, say, with a backstrap loom). Unless you have a computer-controlled loom which can alter individual heddles.

There are introductory video classes on both these loom types at Craftsy.

= = =

Easy co-ordinates – reduce the number of shapes

November 20, 2010

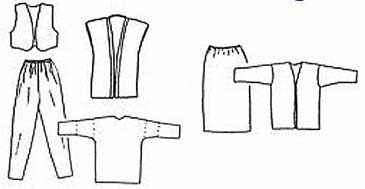
It’s Sewing With A Plan (SWAP 2011) contest time again. Which means making a group of garments that ‘go together’, that are interchangeable.

At the simplest, it’s a trivial problem. Suppose the rules are to make 6 tops and 4 bottoms. Choose a favourite top pattern and make it 6 times, and a co-ordinating bottom pattern and make it 4 times. If you use co-ordinating fabrics, all the tops will go with all the bottoms.
Well, SWAP’s a bit more complicated this year, as each garment has to include a new technique. So they would all need embellishment, or special style elements, or to be in unfamiliar fabrics.

But most of us want a wardrobe a bit more interesting than that !
So what makes it easier to co-ordinate ?

Co-ordination means having a group of clothes so you can choose any top plus any bottom, plus (if you wear them) any layering piece, and they all go together without you having to think about it. (Spend the thinking time when you’re planning your wardrobe, not when you get up in the morning.)

Garments go together more easily if they’re related in colour, fabric, and shape. Which is another way of saying : reduce the number of colours, fabrics and shapes. Many people eventually find this becomes boring. But as a way of getting a basic set of co-ordinates it’s a good idea.

Reduce the number of colours. A simple formula is to use a dark neutral, light neutral, main accent, and subsidiary accent.
All in your most flattering shades of course.
If that thought doesn’t inspire, get to know your ‘colour personality’ (see posts on individual colour types in her April 2010 archive).

Limiting the colours also means you only need one good warm coat. And you can use the same accessories for all the outfits. Unless of course you’re a bags, scarves or shoes person, when you’ll want lots of them to make life more interesting 😀

Reduce the number of different fabric types, textures, and prints. There are many wardrobe possibilities based mainly on fabric choice, as in my post on Kate Mathews’ wardrobe plans.

But I’m concentrating here on reducing the number of different shapes. Of course most people who take part in SWAP make inspirational combinations of their own choice of individual garments. But here are some ways of getting someone else to do the shape co-ordinating for you.

– – –

Wardrobe patterns

Choose a Big 4 wardrobe pattern and make several of each item in different fabrics.

There’s an excellent example from Mary Beth of the Sewing Divas. She used Butterick 5333.

”b5333”

SuperSewer Ruthie has just won the Pattern Review One Pattern Wardrobe contest, with her entry of 7 items made in 2 weeks from New Look 6735.

There are many other Big 4 wardrobe patterns with the same basics. Here are a few wardrobe patterns that can be sewn quickly.

A major problem for me with almost all Big 4 wardrobe patterns is that the top-dress is sleeveless or only cap sleeved. That just wouldn’t work for me, as I feel the cold in a moderate climate with minimal public space heating. I started to rant about it, but that isn’t what this post is about. But remember you can’t just add sleeves to the top without checking the jacket. The jacket armhole may need to be bigger and the sleeve wider, to be comfortable worn over another sleeve.

Simple variations of the pieces in these patterns are to add embellishment, or change the length of body or sleeves, remove a collar or change the neckline shape (see necklines post).

– – –

Wardrobes from independent pattern companies

Independent pattern companies rarely offer wardrobe patterns, though there’s one I keep mentioning, Central Park by Park Bench. That’s intended as a ‘complete’ pattern, a basis for ‘creative’ people to vary fabrics and embellishments to make everything they wear. One problem is it’s a one size pattern which you need to adjust to yourself.

”central-park”

And see my post on changing a rectangle shape pattern to other body shapes

If you don’t mind instructions which aren’t in English, Multisnit is the king (queen ?) of wardrobe patterns. In any of their wardrobe patterns there are at least 10 different styles, and I’ve counted as many as 17. Here’s one example, Multisnit 3.37. Yes, you get all these styles in one pattern.

”multi-3-37-sm”

Again in some of these patterns the jackets would not layer comfortably over the tops. Often it looks as if the jackets are meant as more formal alternatives to the tops, rather than as layering pieces. Some of the ‘current’ styles are layered short over long, which doesn’t work for me. That is a personal style and body shape thing.

With one of these patterns, your wardrobe plan becomes : make one of each. . .

Buy online in English from Fjoelner, who have a Danish-English sewing dictionary under the Information tab.

Hmm – good if you like a puzzle and a challenge and know a bit about pattern making. The brief instructions are in Danish with no pictures. Traceable pattern sheet like Burda magazine (remember to add s/as). In the Multisnit pattern I have, one pattern piece is marked for 11 sizes plus all the added lines for making 7 styles. There is an instruction page saying which pattern pieces you need for each style, but it helps if you know what you’re looking for 😀

– – –

Wardrobe pattern books

There are several books which supply a basic group of tissue paper patterns, and suggest ways of making different versions. Change fabric, change length of body or sleeves, add or remove collars and sleeves, add embellishments. Most of these books are by people who have a range of patterns, so you could supplement the books by adding other patterns in similar style.

Perfect Plus book by Kathleen Cheetham of Petite Plus patterns.

”ppwardrobe8”

Much of the book is about making a wardrobe from these 4 patterns.

Sew Serendipity book by Kay Whitt of Serendipity Studio patterns, who also designs for McCall’s.

”kay-outfit”

Half a dozen variations described in detail for each pattern, plus other suggestions.

Sew U book by Wendy Mullin who has her own clothing line and used to design patterns for Simplicity.

”sewucombo”

Many suggestions for changing the style elements on these patterns.
She also has later books on knits, dresses, and jackets (beware tiny patterns).

(P.S. ‘Easy Sewing the Kwik Sew Way’ by Kerstin Martensson is a wardrobe pattern book with simple pattern making instructions for making many styles from tee, camp shirt, elastic waist skirt and pants patterns.)

And there’s an old book in this style : ‘Making a complete wardrobe from 4 basic patterns’ by Rusty Bensussen. The diagram patterns are huge and hugely out of date, but the ideas on adapting patterns are useful and still valid. I posted a modern version in what you can make from one pattern.

Pattern magazines are often good sources for several variations all based on the same pattern pieces. There’s an example from Burda magazine in that post.

– – –

Use only patterns from one designer

There are some designers whose patterns are specifically intended for making variants.

Such as Nancy Erickson of Fashion Sewing Group. A small group of classic patterns, plus booklets and newsletters which suggest many variations.

Shirley Adams of Alternatives has basic casual patterns for two jackets (one with fitted shoulders, one with dropped) and a top. Then a whole series of other patterns and videos showing how to adapt these patterns into different styles.

Bernina My Label pattern software has about 25 modern classic patterns. Once you get them to fit, you can use manual patternmaking methods to develop them into other styles. There’s much guidance on doing this in the support sites.

Another simplification would be to use only patterns from a designer with patterns all closely similar in style. Such as Loes Hinse and her other designs now published by Textile Studio. In fact, most independent pattern designers have a very consistent style, so just choose one of them to make all your patterns from. Here’s my post on recent ones.

The same idea might apply to using Big 4 patterns by the same designer. For example all the Vogue designer patterns by Anne Klein, or by Tom and Linda Platt, or Chado Ralph Rucci, Donna Karan / DKNY, Issey Miyake, or Lynn Mizono. Though admittedly most of these would not be good for SWAP as they’re not usually quick to make !

Or all Palmer-Pletsch or all Nancy Zieman patterns from McCall’s. And Simplicity Threads and Sew Stylish patterns have a common style.

For the more generously sized, Connie Crawford at Butterick and Khaliah Ali at Simplicity have a wide range of patterns with a consistent style.

– – –

Choose one pattern only for each garment type

Choose a small group of patterns, one of each garment type, and make your own variants. There are two interesting strands at Stitchers Guild which show what different ideas people can come up with in answer to this question.
Your tried n true patterns, and why
What constitutes a classic wardrobe

– – –

Of course, most people wont want so many garments that are basically the same. But it’s interesting to see the easiest solutions to the problem of getting shapes that co-ordinate.

I gave some more opinions on co-ordination in my posts on Dressing in 5 minutes :
Tops
Bottoms
Layers

– – –

I don’t want to imply that using a wardrobe plan is right for everyone. I happen to be the sort of person who, if I make a detailed plan, I surface a week later to find myself off doing something completely different. . . What works best for me is an Endless Combinations approach : each item I make or buy must go with at least 2 items I already have.

I think the most important thing is to feel pleased and ‘yes I want to wear that’ when we look at our clothes 😀

What wardrobe plans do best is focus us on thinking whether we’ve got what we need (hmm – don’t buy another white shirt when I’ve already got 12. I’m much more in need of interesting layers). Wardrobe plans are often aimed at helping people to look good at work. And plans are good for people who’re trying a new style. Or who need a small group of clothes for travel or formal occasions. Or to ‘edit’ their existing clothes to get a group that can be worn together without much thought. And wardrobe contests stimulate us to sew these plans quite quickly !

Give THANKS for all the beautiful patterns, fabrics and equipment that are available, and all the helpful ideas and support on the web. I do so enjoy doing all this exploring 😀

P.S. Imogen Lamport has some short videos on co-ordination :
Levels of refinement
Volums
Shape
Line

– – –

Patterns and links available November 2010

Warm vests

November 13, 2010

As well as oversized tops, the second foundation of my winter wardrobe is warm vests. And they don’t appear in most wardrobe plans either. (Hmm, for someone of my generation in the UK, growing up before central heating, a ‘warm vest‘ means an inmost layer. I admit I wear them too :D)

But here I mean the American visible upper layer vest. For winter warmth these are always my cosiest add-ons. There are several directions to go for patterns.

Happily some warm vest styles are also ‘current’. And there are many current vest styles not focussed on warmth. The section on those kept expanding, so I’ve made it a separate post.

– – –

Classic padded vest

I live in these in winter. It would be good to make one, to get the right shape and length. Based on this outdoor survival Jalie 2450 pattern for women and girls, with an underarm side panel for shaping. (Jalie 2451 for men and boys.)

”jalie2450”

Jalie recommend 1 inch/ 2.5 cm thick batting/ wadding, of a make I can’t find in the UK. There is a thick quilt batting/ wadding called Dream Puff (1/3 inch/ 1 cm, part of the Quilter’s Dream range), which claims superior insulating properties. Perhaps we need to go to a more northern European country to get really warming fabrics. Fjoelner in Denmark has various weights of clothing insulation.

Make the vest lined with plaid flannel for extra fun. The ‘current’ version of this padded vest is a blouson : waist length and with ribbing at waist. Worn over a low hip length knit top. Not flattering to all body shapes.

– – –

Classic quilted vest

There are probably hundreds of patterns for quilted vests : appliqué, patchwork, embellished, and usually v-necked. I’ve managed to stop collecting them. Pavelka has one of my favourites.

”pavelkavest”

This sort of quilted vest is much loved as a canvas for individual creativity. So most people who wear them are not bothered if they aren’t ‘current’ 😀

I’m planning to try Thinsulate rather than classic quilt wadding/ batting. Available from outdoor fabric specialists. I haven’t sewn with it, but it must be good for clothes as I have some wonderfully warm gloves made from it.

I prefer a high necked vest for warmth, such as the new Butterick 5532.

”b5532”

Those instructions are for pre-quilted fabric, so adapt if you do your own layering.

– – –

Interesting warm vests

Some interesting vest shapes to try, which look as if they could be made with an added quilting layer. Not surprisingly they come from Scandinavian countries – all with instructions in Danish.

Stof & Stil 25005

”stofstil-25005”

Stof & Stil 25006

”stofstil-25006”

Multisnit 3.43. Buy in English from Fjoelner.

”multisnit3-43-15”

These are one-piece wrap-vest styles. You need confident technique to use Multisnit patterns. They have a traceable pattern sheet without seam allowances, and brief instructions in Danish.

– – –

Fur vests

I love fake fur vests. They have happy memories for me of a winter in Toronto. Many fur vests in the designer collections this season. The ‘current’ fur vest is v-necked, long and wide shouldered. A big look.

For a pattern there’s Butterick 5359 View E.

”b5359”

Though I prefer a jewel neckline for warmth. And preferably a raised neckline. And definitely made so the front opening has no gaps. I have an old pattern like that, but can’t find a current one. The nearest is Kwik Sew 3731 view B.

”ks3731”

[P. S. The vest in new Simplicity 2285 is what I was looking for.]

There is Butterick 3311 for a zip-fronted fur hoodie.

”b3311”

Vests of long shaggy pile fur are made with the pile pointing downwards. But the usual advice for the direction of pile is to have it pointing upwards. And this is important if you’ll be wearing the pile garment under something else. With the pile pointing downwards, it may ‘walk up’ the garment outside it. My mother told a horror story of making a party dress in velvet with the pile pointing down. By the time she arrived at her destination it had worked itself up under her coat. . . to reveal all. . . A vest with the pile the wrong way could be uncomfortable rather than embarassing. But do make the pile pointing upwards, unless it’s so thick you’ll rarely wear something over it !

P.S. Karin’s comment about shearling reminded me of Kwik Sew 3172, a vest with the fur turned inwards.

”ks3172”

For the current ‘aviator’ look, make this double-breasted with an asymmetrical front exposed zip closure.

P.P.S. I confess in winter the last thing I’m worrying about is whether I look fat, but Imogen Lamport has a post on wearing a fur vest and keeping stylish !

– – –

P.S. For classic fleece vests see McCall’s 5991, 5252, 5402.

– – –

So there is a rich selection of different, interesting, attractive, creative and even ‘current’ ways of getting added body warmth without encumbering your arms.

– – –

Patterns and links available November 2010

Types of weaving/ types of loom 2 : frame looms

November 6, 2010

At last we get to types of weaving which move a weft thread over and under warp threads. (My previous post in this group is about weaving without a loom, or without the warp threads held taut on a loom.)

The simplest loom holds the lengthwise warp threads on a ‘frame’. All frame loom weaving methods have the same basis. For many people the first step is to make the frame !

Set up the warp threads on the frame.

Then weave the weft thread or fabric strip under and over individual warp threads by hand or using a needle/ bodkin.
Or tie tufts of yarn onto the warp threads.

‘Beat’ or press the weft threads together by fingers, fork, comb or a similar tool called a ‘beater’.

The frame for the warp threads can be a rectangle of sticks, or slots cut in the edge of cardboard (not the same as ‘card weaving’, see next weaving post !). Do an internet search for tapestry looms, cardboard looms, lap looms to get multiple suggestions on how to make frames (sticks from the garden, old picture frames, cardboard boxes. . .). You can buy frames as well !

The simplest tapestry/ rug type weaving has warp strands about 1/8 to 1/4 inch apart if you’re using a needle to weave with, 1/2 inch or more if you’re using your fingers to weave.

Creative Bug has a YouTube series about making and using frame looms.

Here’s a summary of the ways frame looms are used. As before, I’ve given mainly links to videos, not many pictures.

– – –

Rag rugs

You can wind strips of fabric under and over the warps, to make rag rugs. There’s an excellent series of videos from Expert Village on the steps of rag rug making.

Rag rug weaving can be a good way of using up fabric scraps. You need tough warps to stand up to being walked on, and you can buy linen and jute yarns for this.

My parents had some rag rugs that lasted for about 30 years. I remember when they were made, when I was a child after the war. My mother tore old fabric into strips and we wound the strips around tins of food, then sent them off in a sack to a family in an area of Europe where there was little food. And a few months later the rugs came back. The main point was to hide the gift of food, and as a literal minded small child I found the whole thing most puzzling 😀

You can use similar methods to make less coarse weaves. For example, weave yarn over and under more closely spaced warp threads, probably with a needle or bodkin. When you do this, you can go over and under different numbers of warp threads, to make all sorts of interesting textural weave patterns.

Cardboard looms

On a smaller scale, making small items on cardboard looms has the advantage that you’re not restricted to making things with square corners. You can even buy cardboard looms which are not four-sided. ‘Weaving without a loom’ by Veronica Burningham has some ingenious projects such as making a beret, or both sides of a bag at the same time. As well as projects which can be woven using just household items.

Tapestry weaving

It’s also possible to make areas of colour by using different colour yarns. Here’s a good video

You can have a lot of fun with a piece of cardboard, a darning needle, a ball of string, and some ends of unused knitting yarn. Make coloured patterns, and explore different weave textures to understand fully how they’re made.

But there’s also the potential to make major pieces of art and craft.

”tapestry-loom”
picture source (weaving looms page 4)

– – –

Weave patterns

You can make woven patterns by using different colours or different texture yarns.

You can also make different weave textures, by having the weft yarn passing over or under more than one warp yarn. Easy to try this out on a frame loom, as you control all the under-and-over moves. But this is more explored by people with increasingly complex looms (third weaving post).

”weave-5”
diagram source

Once you start going into this you can find much information online, such as this amazing archive of weaving patterns.

There are several books on weave patterns. And computer software to help with working out how to make them.

– – –

Tufted rugs

This sort of ‘loom’ is also used as the frame for making many types of tufted rugs. There are different ways around the world of knotting lengths of yarn onto warp threads on a frame.

”persian-qashqai”
Persian rug picture source

There’s much information on the web (from casual to scholarly) about knot types, and the patterns typical of different areas of the world. As a starting point, here are some short videos from the Victoria & Albert museum.
There are also several DVDs.

– – –

So, with these very simple methods where the weaver makes each individual under and over move or knot separately, you have great freedom about what you can do, everything from simple to complex in the placement of colour and texture.

These methods of weaving on a simple frame can go from children’s play through homely conveniences to high art.

But these ‘one stitch at a time’ methods are very slow. Most looms are tools for speeding things up a bit. Though what they gain in speed, they loose in flexibility. These faster looms are in my next weaving post.
(Post on simple weaving with heddles or cards.)

– – –

Links available November 2010