Archive for November 2009

Pattern making software, armhole depth

November 28, 2009

One thing I’ve found is that I haven’t got an average distribution of upper body length above and below my armhole.

I’ve been checking pattern making software for which versions include this in their basic measurements. As far as I can discover from web sites and demos :

Yes, this software includes armhole depth in the basic measurements :

Bernina My Label

Dress Shop

Garment Designer (link on left in menu along top)

My Pattern Designer

No, does not include armhole depth in the basic measurements :

Pattern Maker

Pattern Master from Wild Ginger.

– – –

All except Garment Designer are for PC only, not for Mac.

Armhole depth is just one detail among the many ways they differ, and it won’t matter for most people. Software differs in the measurements and styles included, the way styles are chosen, and how design changes are made. If you’re interested, have a thorough check of information and demos as they really are very different.

Also some people find they don’t enjoy sticking computer printer paper together to get a pattern.

If you want to try this, you could download a free pattern from : BurdaStyle

Or there are a couple of ways to include some of your own measurements :

Pattern Maker based software CD in a book : Marie Clayton Make your own clothes.

Click and Sew selections from Pattern Master on CD from Wild Ginger.

(Again, I’m just saying these are available, not how good they are !)

– – –

Some people are enthusiastic about pattern making software. Some use it a few times and then go back to conventional patterns. Others do not get on with it at all. For me the problems are :
– although I put in a great deal of effort, I never managed to get it to fit me.
– I’m a physical person, I like to see what is happening in front of me, in paper shapes, scissors, pens, rulers, not hidden away out of sight.
– I’m not a designer. I can look at a pattern drawing and decide whether or not I like it. But all those little details that distinguish a pattern I like from one I don’t – those I can’t think of for myself. So I don’t like designs I get from my own decisions using software as much as the designs I get from a commercial pattern. Or perhaps I could make decisions about a design by looking at and changing a trial muslin in front of me, rather than by deciding in the abstract that I want a cuff to be 3 inches rather than 3-1/4 inches deep. . .

Tip 1 : if you have problems with fit, make a fitting sloper by conventional methods, and then try to get the software pattern to match your fitting sloper (that’s how I found the software I was using was impossible for me).
Tip 2 : it may be necessary to put measurements into the software which are not exactly your measurements, to get the software to produce something that fits.

– – –

P.S. Oh dear, I’d forgotten that ‘pattern making’ means something very different to software engineers ! If you follow up the suggestions automatically made by WordPress, you’ll end up in some unexpected places. . .

My ideal SWAP wardrobe ?

November 21, 2009

The rules for the Sewing With A Plan 2010 contest at Artisans Square are available. The idea is to make a wardrobe of co-ordinating pieces.

I don’t do well under pressure so won’t be taking part, but I love making plans so I’ve already made several 😀 I admire people who make one plan and stick to it, but my mind just doesn’t work that way !

There are 3 options this year. Two include dresses, which don’t fit my lifestyle. So I choose Option No. 1 :
6 tops  – t-shirts, shirts, blouses, or camisoles
4 bottoms – jeans, pants, shorts, skirts or kilts.
1 your choice (not an accessory)

This isn’t an ideal basis for my wardrobe, as I wear multiple layers. But this is just a fun plan anyway, so that doesn’t matter.

– – –

Note : Butterick-McCall’s-Vogue has changed their websites. My BMV links now only get you to a page where you can search for a pattern number.
I apologise that I haven’t changed to the new individual URLs, but it would be a lot of work.

– – –

6 tops :

When I let ideas spring to mind, I was surprised to realise my choices for tops are all Sewing Workshop patterns. Perhaps it’s not so surprising. They’re independent designers with a good selection of ‘pear shaped’ styles : flared sides with fitted shoulders. Rather than straight up and down styles with dropped shoulders, which are not flattering on me, and which most independent designers focus on.

Despite that, my first choice is a modern ‘sloppy joe’, the Hudson top. I think this works because it’s oversized. Straight sided patterns look bad on me because I need 2 to 3 sizes too large on the top to get fit over my hips – not surprising they look awful. . . On an oversized top like the Hudson, the side seams are somewhere out by the wearer’s elbows, which has a different effect.

I think this is modern because the armholes are high and the sleeves slim. Not like similar styles of 20 years ago which had such deep armholes they were like dolman sleeves – not flattering on me.

”hudson”

In their latest newsletter (link below), Palmer-Pletsch recommend short tops with wide pants, or long tops with slim pants. So presumably they would prefer the shorter top with these pants. Personally I look better in longer tops and in slimmer pants, and would be unlikely to use this pant style.

Perhaps that top is easy to make rather than ideal for me. For a more flattering shape, I need good fit at shoulders and flare over hips. Here are a couple of Sewing Workshop possibilities :

Spring Street : (oop) an attractive shirt with unusual collar. Though in the pattern the shoulders are more dropped and the sides less flared than they look in the line diagram. This is a rare case where the fashion drawing is closer to the style than the diagram is.

”springst”

Zigzag : has a front yoke. Perhaps it’s the recent version of the Spring Street shape, with changed collar and sleeves.

”zigzag”

Zona : has interesting seam and dart placements. It isn’t flared, so I would add some, probably at the underam.

Another pattern which meets my criteria is the Liberty shirt. And it has my favourite high collar. But I can’t include everything !

These tops would be good for me as they can also be worn as layering pieces – a way round the SWAP rules if you need warmth.

Inspired by the What did you wear today ? strand at Stitchers Guild, I really do need fitted tops as they are more flattering for me. I think I might be willing to post a photo of myself wearing something fitted, though not wearing my usual shapeless RTW. But oh fitted garments do need so much trouble with fitting ! Still, I would like to have these 2 patterns as TNTs, so. . .

Tribeca : I love this style – reminds me of a blouse I happily wore to rags. Sad to say, I gave up on my first attempt to get all those darts to fit my small busted, short waisted, high hipped, sloping shouldered, forward necked self, but one day. . .

”tribeca”

Salsa : another attractive style which would also need a lot of careful fitting on me.

”salsa”

All these tops have raised necklines, which suit my longish neck.

– – –

4 Bottoms :

I just wear pants as neutral background for tops. The Zigzag and Mizono (below) patterns include slim pants, so if they work well they could be a good basis. As I’ve chosen tops which cover the waist, the unflattering effect of an elastic waist on me would not matter so much.

Co-ordination : It isn’t necessary in the SWAP this year for all tops to go with all bottoms, but they are supposed make a ‘collection’. If the pants are all similar, that would ‘just’ be a matter of fabric choice. I’m cheating by not mentioning fabrics, as many people find this the most difficult part of making a co-ordinated wardrobe.

– – –

Optional item :

This would have to be a layering piece, to give me some warmth. To meet the rules, I’m only allowed one jacket, but four come to mind. There are recent Koos Vogue 1146 or Mizono Vogue 1145 patterns.

”koossmock”

”mizonocoatpant”

I love the snuggle look of the Mizono style, but it’s tapered at the sides, oh dear – well it’s big so perhaps it would be okay.

I also love the scarfed swing coat style. There’s DKNY Vogue 1129, said to be Easy but actually needing fitting skills. Ultimately I do need to do that fitting work, as I would like to wear a fitted coat instead of my big straight parkas. And fitted RTW just looks ridiculous on me.

”dknyscarf”

Or for a much easier scarf jacket there’s McCall’s 5987.

”scarfjkt”

Co-ordination – a layering piece has to work over all the outfits made from tops and bottoms. I don’t think the Koos jacket would work well with the necklines of the tops I’ve chosen, but the others would. I think the Mizono all enveloping jacket with big shawl collar would be a good choice from that point of view.

If I make the most sensible choice, it’s the McCall’s scarf jacket. But if I choose by love, it’s the snuggley Mizono or eventually the DKNY fitted one !

(P.S. Oh dear, Palmer-Pletsch in their latest newsletter recommend this DKNY scarf jacket for the inverted triangle shape. As I’m a pear, perhaps I need to re-think that one 😀 )

– – –

There are some subsidiary rules for the SWAP this year, to test sewing skills.

1 [garment] will be a matched print or stripe.
1 will feature embroidery, beads or sashiko.
1 will have buttons as the star feature OR use unusual or alternative closure(s).

Matched Stripes :

It would be fun to make the Zona top with matched chevron stripes ! Each piece would have to be cut individually – start from one of the fronts and work round. Use a pattern with seam allowances removed, as it’s essential to match sewing lines not cutting ones. But it would probably be impossible to end up with stripes matching at the front, so this isn’t really a good idea. . . It might work by shifting the front opening sideways so the stripes at the edge of the opening match the other side when the front is closed. And it would need the side seams changed to vertical.

Or I could use the Stripes Alive shirt from Brensan Studios. Ah, that wouldn’t be valid. For the SWAP you’re supposed to show your skill by matching stripes, and the whole point of that pattern is you don’t have to match stripes at all 😀

Embellishment :

The obvious choice to embellish is the Koos jacket. It’s designed to add embroidery to. Or the yoke could be made with sashiko. But otherwise that pattern doesn’t fit well with this plan.

The yoke of the Zigzag top would also be an easy place to add embroidery, beading, or sashiko. Or the seam and dart lines of the Zona top could be emphasised by added trim or embroidery.

Buttons :

I could use the Diane Ericson Revisions Nuevo shirt View B, instead of one of the other tops. Those dots on the shirt front are actually small buttons.

”nuevo2”

Or take inspiration from this John Galliano jacket covered in brooches 😀 (s/s 10 RTW)

”

Photo from Style.com. Patterns available November 2009

Can you get into it ? Does it look tight ?

November 13, 2009

What size do you need a top ? I made a mock-up to test how big a pullover needs to be for me to get into it. Then I realised I could also find out how big a layering top needs to be so it doesn’t look strained.

– – –

Size for layering tops

I made a mock-up from a couple of large non-stretch fabric rectangles. I gradually moved the side seams in until it was just too small, when the fabric looked a little strained and lumpy.

Here’s my suggestion for the size of fabric to cut :

”mockupw”

Use your largest measurement to choose the width.
If you need an FBA or have a large abdomen, cut the front piece 4 – 5 inches wider than the back. Align the side edges to sew the seams.

Sew the initial seams as marked. Use contrasting thread.

The largest I want a layering garment to be is over a thick sweater. So I started by trying my mock-up over that.

I’m larger below the waist than above, and my hips are my largest part, so I started by checking fit over my hips.

I basted the side seams further in, 1/4 inch or presser foot width at a time. Until the first time when the fabric was a little distorted at hip level. So I knew the previous size was the smallest I can wear a layering top over a thick sweater and look good. And I measured between those seams.

Then I tried the mock-up over a thin layering top, and moved the seams in again.
Then I tried it over a loose shirt and camisole.

(It’s getting cold here and I forgot to test for best basic layer looseness. I could unpick some of my mock-up seams, but I think anyway it’s better to try close fit using a test garment with darts.)

So I knew about layering tops for my hips. Then I moved on to testing fit without strain at the underarm. For this, I just sewed short seams above the waist.

Here’s a scan of part of my final seams (looks better in real life !) :

”seam-arrow”
Arrow points to size to measure for the underarm.

If you’re larger above the waist, start by testing your underarm. Then you could check how much narrower you can go at hip level and still wriggle through it.

From this I found that for me a successful layering garment (tunic, vest, jacket, etc.) needs to measure at the underarm :
over a thick sweater : at least 45-1/2 inches
over a thin layering top : at least 44 inches
over a loose shirt : at least 42 inches.

Don’t use my numbers for yourself. I think people with different styles, shapes, and favourite fabrics will get different results. I used a medium muslin with a bit of body for my tests and I don’t wear close fitting clothes.

You could also use this mock-up to try out different neck opening sizes.

– – –

‘Wriggle into’ room – getting the garment over your shoulders :

You’re making a pullover top. Using a pattern you’ve made from a blouse/shirt or jacket pattern by closing the opening, can you get into it ?

You may need to remove waist shaping (see later) :
– Don’t sew any waist darts.
– Straighten out the side seam from bust to hip.
Also check the neckline opening is bigger than your head.

Then, if your bust is larger than your shoulders, you should have no problem getting the garment on.

If, like me, your shoulders are bigger than your bust, you need to check this. With a knit fabric this may not be a problem, With a woven fabric with no stretch, it may be. I found my results interesting.

”shoulders”
(black diagram from Fit For Real People p.66)

My shoulders at rest measure 41 inches, and my bust is 36 inches. So I assumed I would need something bigger than my bust to be able to get into it.

I tried my mock-up over minimum clothes to find what is the smallest I can wriggle in to.

I found I can get into something that is several inches smaller than my top : 32-1/2 inches. Not that I’d actually ever wear anything that measurement ! It was very uncomfortable, but certainly endurable for the short time of getting a garment on.

I don’t know if there’s something odd about my shoulders, or if this is true for other people. But at least for me, getting something over my shoulders is less of a problem than I thought it would be. It looks as if I don’t need to remove all the waist shaping in a pullover pattern just so I can get it on.

– – –

How do you compare your findings with the pattern ?

The finished garment measurement is usually printed on the pattern, somewhere near the bust and hip points. Or it may be in a table near the beginning of the instructions. If it’s not supplied, measure the pattern (allow for seam allowances).

”bustpt

On the McCall’s 5664 pattern I based my pattern alterations on, the finished garment in my size is 43-1/2 inches at underarm. For a layering top over a loose shirt I need 42 inches. Over a thin sweater I need 44 inches. So I could wear this top over a loose shirt, but it might not look good over a thin sweater. If I wanted a top to wear for that, it could be best to alter this pattern a little.

The Nancy Zieman oop McCall’s 5526 jacket (left below) has 40 inches at underarm. Obviously designed to be worn over something light, a camisole or perhaps a fitted blouse. The Marcy Tilton Vogue 8454 jacket (right) has 45-1/2 inches at underarm. So I could easily wear that over a thin sweater, possibly over something thicker.

”nzmtjackets”

If you want a layering item to wear over a thick sweater or a big jacket, also measure your biceps. Check the pattern sleeve width is at least a couple of inches larger.

I’m surprised how much I’m using this information. It makes it easy to check I can use a pattern for what I want without changing the size. I’ve also used this to buy mail order from companies that say what the actual measurements of their garments are.

– – –

Enlarging the underarm size

What to do if your pattern is too small ?

If you need 1 inch (2.5 cm) larger, add 1/4 inch / 6 mm to the pattern at side and sleeve seams, as in the diagram.

”addi-u-a”
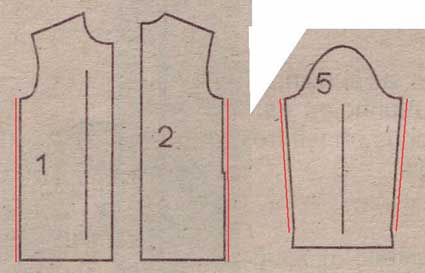
(Butterick oop 5803)

If you need 2 inches (5 cm) larger, add 1/2 in. / 13 mm at each of the marked places.

If you need more than 2 in. (5 cm) added at the underarm, sorry this size is not a good starting point for you to make a pullover or layering top with minimal changes.

If you go up a size, you don’t only increase the underarm. You also lower the neckline, lengthen the shoulder seam, and enlarge the armhole. These are usually good for a layering top anyway. But it’s worth checking if the changes are flattering on you.

Or start from a pattern that is more loose fitting.

– – –

Ease

You don’t need to know about ‘fitting ease’ to assess patterns for layering, but it’s related. And it’s useful to know when buying patterns.

The difference between actual garment measurement and body measurement is called the ‘ease’.

For example, the McCall’s 5526 jacket size 14 measures 40 inches at underarm. My bust is 36 inches. So the underarm ease of this pattern is :
40 – 36 = 4 inches.

Here is a general post on ease levels.

And here’s a simplification of the Ease table in the Vogue print catalogue :

top :
fitted : 3 – 4 inches
semi fitted : 4 – 5
loose fitting : 5 – 8
very loose fitting : more than 8

jacket :
fitted : 4 – 5 inches
semi-fitted : 5 – 6
loose fitting : 6 – 10
very loose fitting : more than 10

The finished underarm measurement of a pattern isn’t usually given on the envelope. So you have to use the fit description when choosing a pattern.

For example, for a garment to wear over a thin sweater, I like at least 44 inches at underarm. So I need 44 – 36 = 8 inches of ease. The table tells me I can get this from a top pattern described as very loose fitting, or a larger jacket described as loose fitting, without having to make underarm changes.

– – –

A long top

While you’re experimenting, why not try out lengths as well. To make a fashionable thigh length top, most people need to add about 10 in./ 25 cm to a low hip length pattern, and add about 20 in./ 50 cm to a high hip length one.

Some people look better with a long top at mid thigh. Others look better with a top an inch or so above the knee. If you look good in several widths of pant leg, you may find you look best in different lengths of top, depending on how tight your pants are.

Robin has some good posts on body length proportions.
body quarters
body eighths
more on proportions
Detailed written instructions are in Fit For Real People pp. 62-73 or Looking Good pp. 31-33 ,(Palmer-Pletsch books).
Robin has the good idea of using a square to make the marks – much easier to do it without help. You don’t need a drawing instrument square. Any firm corner will do – a piece of cardboard, even a full pattern envelope !

– – –

Getting this information is like making a fitting sloper, but a lot less work. When you’ve done this once, you know your head size (previous post), the size you can get your shoulders through, and the sizes you need for layering items. Then changing a pattern from open to closed can be relatively simple.

And pattern making is an art not a science. So long as you can get the garment on, you can of course change anything in any way you like 😀

– – –

Patterns and links available November 2009.

= = = = =

From Shirt to Pullover – close opening, check neckline

November 3, 2009

Changing from an open fronted design to a closed one looks as if it would be easy – just remove the button band.
But there are some important things to check !
– can you get your head through the neck opening ? – see below.
– can you get into the garment ? (links to advice below)

– – –

Removing the overlap

Removing an opening is fairly easy :

Assuming a front opening :
(If you’re starting from a pattern with a separate front band you’ll have to join the pattern pieces – overlap the seam allowances.)

Mark the centre front line (not the edge fold line) on the pattern (it should be printed on).

”cfline”

(I haven’t yet conquered high image quality, but hope the photos make the point.)

Trace the pattern to this line.
or
Fold the pattern on the line.

”foldbakc”

Add a note on the pattern, to remind you to place this edge on the fold of fabric.

Hey presto !

Though actually it’s essential to check the neck opening and underarm ease before cutting out.

– – –

Size of neckline opening :

Can you get your head through the resulting neckline neck opening ?

Measure your head. This is not your hat size, but your head measured loosely over hair, ears and nose. This is the size your neck opening needs to be for you to get it over your head. If you want to protect your hair-do or make-up, add an inch or two more.

On the front and back pattern pieces, draw in the neckline and shoulder seam stitching lines. This is easy to do with a French Curve which has 5/8″ (1.5 cm) marked along the curved edge.

”neckstline”

Measure the stitching line on the front and back patterns. Use the edge of a tape measure. Remember not to measure across seam allowances.

”

Then
(back neck stitching line length + front neck stitching line length) times two
is the length of the neckline opening.

Compare this with your head size.

For example, on my fitting sloper, the back neck stitching line measures :
3-1/8″
The front neck stitching line measures :
4-5/8″
So half of neckline is :
3-1/8 + 4-5/8 = 7-3/4″
And the complete neckline stitching line length is :
7-3/4 x 2 = 15-1/2″

My head measures 25″ (long hair up back of big head). So, if I want to use my fitting sloper as the basis for a pullover pattern, I need to make the neck opening much larger !

– – –

Changing the neckline

If the pattern neckline is not big enough for you, there are many things you can do.

To keep the same shape of neckline, lower the stitching line an 1/8″ (3 mm) at a time, until the opening is big enough.

”lowstline”

Or redraw the front neckline to a V or scoop neck, or widen the neckline at the shoulders to a boat neck.
It’s easiest to change neckline shape if you retain the shoulder point (where neck line and shoulder seam stitching lines cross). Then you can alter the front without having to alter the back to match.

Or add a neckline slit, front or back. Or a half-length closable opening, such as an exposed zip or henley/polo button placket.
Or transfer the neckline from another pattern.

I’ve taken several classes with Shannon Gifford at Pattern Review. So I’ve learned to trace my patterns. If you’re doing that anyway, making small pattern changes takes little extra effort.

– – –

Edge finish

Whatever neckline finishing treatment you use, make sure to lengthen it to match the new neckline.

Making a facing pattern

It’s easy to make your own facing patterns. Draw a line 2-3″ (5-7.5 cm) from the stitching line. That is the outer edge cutting line of your facing pattern.

”

If narrow facings flip out for you, use the 3″ / 7.5 cm width. For me, this happens with wider necklines.

Lengthening a collar

If the pattern has a collar, you’ll have to alter that to match the new neckline.

On the body pattern pieces, measure the neck stitching line from Centre Back to collar attachment point on the front.
On the (half) collar pattern, measure the neckline stitching line.
Calculate the difference between the two.
This is the amount you need to change your collar (you measured half the body pattern, so it’s the amount to change half the collar pattern).

On a straight collar, alter at centre back.

These collar templates have a choice of lengths marked at centre back.

”

With a curved collar, mark the position of the shoulder seam. Then slash and spread, or slide, by the amount needed. You probably need to spread more at the outer edge of a curved collar, so it will lie in the same way as the original.

”curvedspread”

If you want to test your new collar pattern before cutting fabric, cut it out in kitchen roll paper. This has much the same firmness as interfaced fabric, and sticks to clothing without needing to pin it in place.

– – –

There are some more important questions about turning a pattern with a full-length opening into a pullover top :
– can you get it on over your shoulders/bust ? I’ve got so much to say on that, I made it a separate post.
– is there enough ease at bust or hip level to be comfortable ? That’s also covered in that post.
And here’s a post on ease in general.

– – –

Links available November 2009

= = = = =