Archive for the ‘fit of clothes’ category

Change muslin, acknowledge original ? – dartless pullover

November 17, 2012

I keep talking about getting a well fitting starter block, then using it as the basis for patterns. But what I find myself doing in real life is start from a basic commercial pattern, and alter that to fit and flatter. Then using that as the starting point for other versions.

I’ve found I have to do most of the fitting work anyway even if I use personalised drafting methods or fitting aids, which assume a more average body than mine (see my post on fitting aids). So I might as well work by getting the fit of a commercial pattern right, rather than drafting or using a fitting aid and then still having to make all the fitting changes.

So I wondered how much I should acknowledge the original commercial pattern. How many changes can I make before it no longer counts as the same pattern.  Would the original designer be aggrieved if I didn’t mention her, or insulted if I did  😀

Asked a question about this at Stitchers’ Guild, and got some interesting and wise replies.

I think there are two different goals of changing a pattern:
– deliberately use a pattern as the starting point for making a different design,
– alter a pattern to fit and flatter, and find you’ve made so many changes the result could count as a different style. But getting a different style was an incidental output of the process, not the intended outcome.

It’s this second process I’m commenting on here.

I have two clear examples, which I’ve come to different conclusions about. I wanted a version that fits well and looks good, and assumed I would make minor changes. But the original patterns I chose obviously aren’t good starting points for me, as nearly every proportion and curve of my version is different from the original. So it could count as a different pattern. This post is on a loose drop-shoulder dartless pullover top. Second post is on a raglan sleeve knit top.

– – –

A casual pullover top

Last year I did a lot of work on fit and flatter of a casual pullover top.  The most basic dartless top pattern has front and back armholes the same, which doesn’t give anywhere near a good result on my high round back and sloping shoulders. I added shoulder darts, changed shoulder slope, changed body and sleeve length and width (front and back not the same), changed shape of armhole and sleeve cap so they fit well, changed to a more flattering neckline for me.  The only thing unchanged was the parallel sides of the body ! 

My starting point was Taylor Made Designs Sew-Easy Shirt by Cindy Taylor Oates.

”cto-sew-easy-shirt”

I think I could have started from several other commercial patterns (or drafted my own from the instructions at Burda Style) and had to make similar alterations.

Perhaps Cutting Line Designs Two x Four.

”lc2x4”

or The Sewing Workshop Hudson top.

”sw-hudson425”

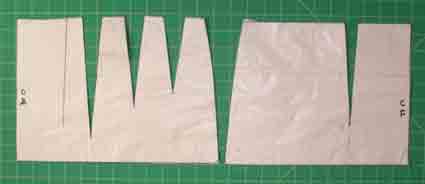
Here’s the front of my version (white) compared with Cutting Line 2×4.

”lc2x4-mine”

Look at the middle line of the commercial pattern. Well, mine is the same width at bust level !

Many people love this Cutting Line pattern and find it fits ‘out of the envelope’. But obviously my comfortable and well fitted armhole and neckline are different. (Yes, my version is drop shouldered on me 😀 )

There are many similar casual top styles. (For general comments on this type of casual ‘dartless’ block, see my post on them.) I decided my version is one of the large family of slightly drop-shoulder loose fitting top patterns, and I needn’t mention the original designer. Many people would acknowledge the starting point even for such a generic design. I would mention Cindy Taylor Oates if I used her piecing inspiration.

– – –

A far from tidy muslin – new armhole and sleeve cap

Perhaps some of you are like me, and daunted and amazed by the pristine muslins people show in their blogs. So here is part of the armhole development for my personal sloppy top pattern.

”sloopy-top-armhole2”

Made using swedish tracing paper, which I love – trace the pattern and mark out a sewable trial garment in one step ! A little stiff and no ‘give’, so not for testing draped or bias designs. Many people prefer to use fabric, but my first trial of a pattern is usually far from a good fit, and this is excellent for showing all the sags and strains.

Here’s a comparison of sleeve caps, my muslin and the original. My version is the final one of several as I looked for a way to match sleeve cap to new armhole. Compare with the middle original line.

”ctosleevecap2”

(I didn’t discover a magic method for developing a sleeve cap – involved a lot of reading, guesswork, and trying things out.)

Obviously big changes to armhole and sleeve needed to get a good look on me.
Two main changes :
– a higher more fitted and scooped out armhole, which usually needs a taller sleeve cap,
– front and back armholes and sleeve cap different. The usual casual drop-shoulder pattern, with front and back armholes and sleeve cap the same, doesn’t fit well on my rounded shoulders.

– – –

A few general thoughts on muslin making

I consider the ‘muslin’ is a working tool, and I like seeing evidence of the alteration steps I’ve gone through. Other people greatly prefer tidiness. Some people make a new muslin each time they change the fitting pattern. That approach I confess would drive me wild with boredom.

An interesting process, especially now I’ve done enough pattern work to be happy with slashing and spreading and generally altering. In the confident expectation it is possible to get there in the end !

Not a feeling I got from working with ‘easy fit’ tools of any type. I definitely didn’t enjoy my initial stages of learning to fit, as ‘easy’ fitting aids didn’t work for me, and much-recommended fitting texts didn’t include the guidance I needed. I had the same lack of success with pattern making software, and with the personal slopers produced from drafting instructions in pattern making books. I felt lost and confused. All these people telling me their method produced marvellous results – and on me it looked terrible. . .

Now I have Liechty & Co’s Fitting and Pattern Alteration book, I know that all those ‘easy’ methods which claim to work for everyone actually only deal with about a quarter of all fitting issues. I know more about what I’m doing, and expect to experiment rather than get it right first time.

It’s certainly very rewarding when things transform from lumpy mess to sleek and flattering 😀 I still remember my delighted amazement when for the first time the CF lines on two sides of a pattern fell neatly together all the way down without any pulling and tugging on my part ! Or the first time I made a high round back adjustment, and the back fell down smoothly from the shoulders. . . We sewers do have simple joys 😀

It was also exciting to find this sort of boxy top doesn’t have to look bad on me – I’m so used to that from RTW I thought it was part of the style !

Well this has turned out to be more about muslins than attributing the origin of the design. . .

Good Luck to all who need to make so many changes to a pattern just to get it to look good 😀

– – –

Patterns and links available November 2012

= = =

Getting to know my sizes

November 26, 2011

Many surprises when I started exploring pattern blocks earlier in the year. One was that many methods of drafting patterns to individual measurements assign half your bust/ waist/ hip measure to front and half to back. Surely not, I thought. And indeed it isn’t true for me.

Some pattern making books do include front-back differences. I’m using :
Knowles. Pattern making for fashion designers : juniors, misses, and women.
Allemong. European cut.
Liechty, Rasband, Pottberg-Steineckert. Fitting and pattern alteration (hurrah, my birthday present this year).

– – –

Taking my measurements from waist to thigh

Wearing leggings and tank, I rigged myself up with :
– horizontal velcro tapes at waist, high hip, hip.
– vertical tapes at CF, side seam, and CB.

Needed to adjust the position of the side tapes so they :
– looked from the front as if they were at the edge of my body.
– looked from the side as if they roughy divided the area of the body in half.

No photos – I haven’t got a leotard, so it was all rather untidy !

I don’t attempt to measure to an accuracy of 1/16 inch or 1 mm, as BML tells you to. Impossible accuracy with a soft flexible body. It’s easy to change the measure much more by a slight change in tension of the tape measure or posture of the person being measured.

I know 1/8 inch can make a difference to the quality of fit. But that’s in fabric being tried on. I aim for measures to the nearest 1/4 inch/ 0.5 cm. Details to be adjusted on the ‘muslin’.

– – –

The results

My total waist measure is 33-1/2 in., total hip 43-1/2 in.
Both Big4 pattern size 18.
Apparently no problem there then.

But look at the details and a very different picture emerges :
. . . . . . . . . front . . . . back . . . . total (inches)
waist . . . . 19 . . . . . . . 14-1/2 . . 33-1/2
high hip. . 20-1/2 . . . 21 . . . . . . 41-1/2
hip . . . . . . 20-1/2 . . . 23 . . . . . .43-1/2

(Sitting hip 46 in., important to know for ease allowance.)

Interesting, I still have a waist at the back, but there’s all that stomach sticking out in front. Yes, it does go in and out daily.
And my high hips are important, so :
– darts below waist need to be short, and mainly at the back.
– below high hip there’s little change.
My high hips are about 3-4 inches below my waist. But as I have a tilted waist (higher at back due to high hip pads), a level high hip is not the same distance below my natural waist all the way round.

Double those measures – so these are just imaginary numbers, assuming my back and front are the same :
. . . . . . . . front . . . back (inches)
waist . . . . . 38 . . . 29
high hip . . . 41 . . . 42
hip. . . . . . . . 41 . . . 46

Comparing those numbers with the BMV size table, that means my pattern size is/ are. . . (I’ve added bust here, I knew this before.)

. . . . . front . . . . back
bust . . . . 14 . . . . 16
waist . . . 24 . . . . 14
hip . . . . . 16 . . . . 22

Eeek ! no wonder I’ve never been able to wear a sheath dress or a leotard 😀

I’ve still got an indented waist in silhouette from the front, but have difficulty fitting it. Easiest with a waist seam, which isn’t usual in a blouse. I’m sure it is possible to get princess seams to fit me well at the back, but I haven’t got round to it.

Here’s my personal waist-to-hip pattern which shows the different front (right) and back shapes.

”hip-templates-web”

These measures helped me understand much, but they don’t give the complete picture. My front waist and hip measures may be similar, but I’m not the same shape all the way down – forward spreading waist becomes hips spreading sideways. Visually, my widest hip is lower in my silhouette from the front than it is in my silhouette from the side. And unlike my stomach, that large back is just generally large, not protruding.

Don’t even try to imagine what I look like in a RTW fitted jacket !
Though I do promise I have never bought one 😀

Some people need front bigger than back below the waist. Sandra Betzina ‘No Time to Sew’ p.15 says she cuts a size 14 pants front and size 10 back.

Above the waist, I have small bust and wide back. Many people have larger upper front than back. FBAs need to be adjusted for personal shape and ease preference. See my post on the FBA for some comments.

– – –

Other special features of my shape

Here are some other features of my body, as described by Liechty et al.

Short lower rib cage/ high waist.
short between armhole and waist

High neck base.
similar to sloping shoulders but I think this is more ‘me’.

Forward head.
raise back neckline, lower front neckline

Shallow chest.

Low bust position.

Rounded upper back.
Shoulder darts essential

Cylindrical upper torso.
Scoop out armholes sideways. I haven’t got large biceps but do need a large armhole. I’ve learned to check cut-on sleeves to make sure they’re not tight.

Larger elbows.
Don’t know if my bones are large, but I do like to be comfortable when I bend my arms.

Longer lower torso.

Cylindrical lower torso.
long crotch shelf/ extensions on pants

Here’s some things which affect style rather than fit :
– I’ve recently realised my forward head has made my neck go visually from long to short.
– lumpy knees (hereditary) and thick ankles.
I have got good features too 😀

– – –

Implications

No I don’t look like a freak.
But RTW doesn’t look good !

And, with so many non-average features, no wonder I find it easier to get good fit by starting from my personal pattern block and adding style elements to it. Rather than starting from a commercial pattern and making all these changes.

I don’t think all this self awareness gets you out of making a trial garment. Even when you’ve gone through the pattern-muslin-pattern-muslin cycle several times and have a good fit, it’s best to check that length, ease, and style elements such as collar shape, pocket placement, etc. are flattering.

Also best fitting method depends on personal preference. I don’t at all enjoy tissue fitting. I prefer working direct with a muslin, ‘reading the wrinkles’. Rather than trying to get all the adjustments done accurately to the pattern before ever trying something on.

But many people love ‘Fit for Real People’, and tissue fitting, and not having to make a muslin. So try different methods to find what you prefer. Every little step is an improvement 😀

– – –

P.S. There have been so many comments about this, perhaps I’d better add some more :

I’d like to to encourage people who have unusual fitting challenges. Of course it’s marvellous if you find commercial patterns which are close to your body shape, or a fitting aid which works for you. But there are people who have too many features away from average for that to be possible. And many of those special features aren’t dealt with in the pattern making books which claim to tell you how to draft a personalised pattern.

I’m not so analytic about all this when I do the actual fitting. I fit by ‘reading the wrinkles’ on a muslin. I make no attempt to resolve all my fitting issues one by one on the pattern before cutting out.

Though there are many fitting issues which need a rough change to the pattern before cutting the fabric, or there won’t be enough fabric available to make the detailed adjustments. (Though if you make a muslin, you can slash and spread on the body to add the wedges of fabric needed.) Such as a long body, or square shoulders, or a large bust cup, or protruding front and rear when fitting pants. Or different sizes front and back, above and below.

And I am the sort of person who likes to understand what I’m doing. For example, I need a personalised armhole to be comfortable. Liechty et al is the only book I know which explains what it is about my body which makes this necessary, and what to do about it.

– – –

Patterns and links available November 2011

= = =

‘Fit to Flatter’ by Amy Herzog

November 5, 2011

October 2016. Amy Hertzog’s on-line tutorials are no longer available. She now has a book, Knit to Flatter, and a Craftsy class, also Knit to Flatter. She gives much detail about hand knitting, but the general ideas apply to all garments. This post has some comments on applying the ideas to dressmaking patterns.

Amy Herzog’s tutorials are a marvellous series about the style elements that flatter and don’t flatter different body shapes. And how to make fit changes.

It’s for knitters, but most is relevant to dressmakers. We have similar basic problems :

– We can’t try something on until it’s partly finished. So how do we know beforehand that we aren’t wasting our time, effort, money, and beautiful materials on making something that looks marvellous on the model and dreadful on us ?

– Most of us have body features that are not ‘average’. How can we alter an ‘average’ pattern so it fits us better ? This is actually easier for dressmakers – we just have to alter the paper pattern. We don’t have to calculate the details of stitches and rows.

In this series there are excellent photos of real people wearing right and wrong shapes (generous of them to show that). Especially tops and casual jackets. The examples are hand knits, but the advice about styling and shaping applies to any clothing, made or bought.
So read “dressmaker” instead of ‘knitter’ and “top” instead of ’sweater’.

Full of ideas and inspiration 😀

– – –

1. Introduction

2. Shapes
Types of body shape and suggestions about what flatters them.

3. Mindful project choice
Starting from body shape and showing what styles do and don’t look good.
Also starting from patterns and suggesting body shapes they look good on.

4. Sweaters [tops] and you
Use photos to identify your body shape.
Take interesting measurements.
Some comments on easier and more difficult pattern changes.

5. Necklines
Advice on necklines that flatter different body shapes.
Instructions for changing width and depth of neckline in knitting patterns.

(Knit stitches are not square, which adds complications. This is why she mentions ’knitters graph paper’. There are web sites where you can enter the number of stitches and rows to the inch/ 10 cm for your knitting yarn. The site produces graph paper with those proportions. You draw your required shape, with the natural proportions, on the graph paper. And use that to count how many stitches and rows you need to knit the shape.)

For suggestions about changing necklines in dressmaking patterns, see my necklines post.

6. Sleeves
Flattering length, width, and shape of sleeves.
Again the instructions section is about knitting.

For dressmaking patterns, it’s usually easy to change sleeve length.
To change sleeve width or shape which involves changing the armhole, it’s easiest to substitute the sleeve from another pattern. Match up the centre lines and shoulder seams of the 2 patterns and trace the armhole across. If you use the correct armhole for it, you won’t need to change the new sleeve.
If you want a wider sleeve without changing the armhole, most fit books tell you how to alter sleeve biceps width without altering the sleeve cap length. Or simply use a larger size sleeve from the same pattern, with the armhole to match.
Brensan Studios Shirt Club are patterns you can swop sleeve styles between as they have the same armhole.

7. Length
Where best to put the horizontal lines on your body.
When she says to use ’short rows’ if you have a tummy, she means add a downward curve to the centre front hem.
The section on pattern modifications uses measurements of the lengths of your body sections (taken in Section 4). So it applies to dressmakers as well as knitters. Guidance about where you need shaping darts.
For me it’s important to know about my high hips (circumference, and distance below waist) as well.

8. Shaping
Where you need darts, and how large to make them. Advice that’s the same for dressmakers. Good on shaping for the back – I recognise myself here.

When she tells a knitter to use short rows, it’s a way of adding length at the centre of a garment piece without changing the length of the side seams. Dressmakers achieve the same result by adding horizontal darts from the side seams.
Do you know how to add darts to a dressmaking pattern? It’s often easier than in knitting. Perhaps easiest to learn by experimenting with a trial garment to find what works for you.

She thinks we all look best with waist shaping in our clothes. Yes, in an ideal world. But in winter I wear so many layers that looking more shapely than a box really isn’t an option 😀

9. Implementation
Making your custom styled top pattern.
Choosing the best style elements for you from all the previous sections : this is the same process whatever the source of your clothes – knitting, sewing, RTW.
The measurements section is also relevant to dressmakers. Though do add bigger ease levels if your pattern is for woven rather than knit fabrics.

There’s a section for knitters on doing the pattern calculations. This is the only section in the whole series where there’s not much for dressmakers.
For dressmakers it’s the usual strategy :
– develop well fitting personal basic pattern blocks, or learn what changes you need to make to commercial patterns.
– learn how to transfer style elements from one pattern onto another.

10. Conclusions
Review, plus ideas on how to use favourite style elements from any pattern in a way that’s best for you.

(Ravelry is a huge site for knitters. Somewhat akin to Pattern Review.)

– – –

Amy mentions light/ dark colours but otherwise says little about colour, which for me is very important in getting a flattering result. But there are many interesting tips and helpful comments in all this. You do sometimes have to make an effort not to be distracted by details about knitting. But the general principles are the same for all clothes makers. Recommended 😀

All the recent wardrobe planning reminded me how much I like sweater knits. But the simplest sweater patterns are basic rectangles, which are not good on my pear shape. So this Fit to Flatter series is just what I need.

It is very relevant to choosing flattering style elements for anyone. And for making appropriate pattern alterations in dressmaking as well.

– – –

Links available November 2011

= = =

A note on the FBA

February 12, 2011

Some time ago I wrote about adding fabric wedges below the waist, especially so there’s enough fabric to cover a large front or back.

The best known reason for adding a fabric wedge above the waist is the Full Bust Alteration. (Lots of possibilities on the upper back and sleeves too, but I’m not going to talk about them here.)

I don’t need an FBA myself, so have no practical experience. It’s a bit silly for me to comment. But I am intrigued by it as an alteration so have been noticing information. Here’s some of what I’ve found, in case it’s of use to anyone.

There’s a list of links about the FBA by Debbie Cook at Pattern Review.

Adding enough fabric for larger cup sizes is not just a matter of adding length and width to the front pattern piece. A good FBA adds a wedge starting from the armhole, so the added fabric is in the middle of the pattern.

Here’s an example of the wedge in position, and it’s relation to the added length and width.
Before – left, after – right.

”fba”
(wedge about 2 inches)

The photo shows the usual FBA, described in detail in Palmer and Alto ‘Fit For Real People’ p.140 onwards, and also in many McCall’s Palmer-Pletsch patterns. Palmer-Pletsch also have a DVD : ‘Full Busted ? Sew Clothes that Fit !’‘.

Basically, slit up from waist to bust point.
Then angle across to the armhole stitching line at the notch.
Armhole not shoulder, as you may not want to increase the width of the upper pattern. Some people with larger cup sizes may like to open up a wedge to the shoulder as well.
Spread horizontally by the amount needed to go round the bust.

There’s no way of knowing beforehand exactly how large a change to make. It depends on your shape and your personal preferences – how much ease you think looks and feels right for you.

Also slash across to the centre front, and lower the separated section until the waistlines are level. This adds needed length to the front.

”new
(Red lines are new dart stitching lines. Larger cup sizes may look better with the ends of the darts further from the bust point.)

I’m getting more comfortable with the idea of slashing up muslins – it’s the reason we use the cheapest possible fabric ! Write on them, cut them up, keep them for reference. And I’m more patient with not getting fit right at first try.

Bigger darts put more curve in the flat fabric. You’ve added fabric at the centre of the pattern piece, but don’t want the side and waist seams to be longer. The added wedge of fabric also changes the shape of the armhole and the angle of the side seam.

McCall’s fitting pattern 2718 has different front patterns for 5 cup sizes. To make the armhole difference clear, here’s a tracing of the stitching lines for A cup (black) and DD cup (red). (Size 14, the shoulders and necklines are the same.)

”2armholes2”

The DD front pattern is wider, and the bust dart deeper. But also the armhole shape has changed, and the angle of the side seam. Notice the ‘scoop’ of the armhole – the lower edge of the armhole isn’t horizontal. The changed armhole shape introduces a wedge of fabric from the armhole where more fabric is not needed, to the centre of the pattern, where it is.

– – –

Some people who need a larger front pattern also need a larger armhole and sleeve head, or wider shoulders. But not everyone does. So those are separate adjustments.

If your cup size is larger than B (the size commercial patterns are made for), but your shoulders are not large, the pattern shoulders may fit you better if you buy patterns according to your upper chest/ high bust measurement, not your bust. Vogue size charts for Misses include the upper chest measure, but the Women’s chart doesn’t. I e-mailed them to ask about this, but they didn’t reply.

Debbie Cook’s list of links mentioned before includes several links about choosing pattern size by high bust or full bust measurement.

Ann Rowley prefers to buy her patterns by bust size and do a narrow shoulder adjustment, rather than buying by chest/ high bust size and doing an FBA. Here is her tutorial on the narrow shoulder adjustment.

Ann explains her choice by relating it to her own measurements. You only need to do an FBA or narrow shoulders if your shoulders are small relative to your bust. From Ann’s post, it looks as if the best method depends on :
– if your hips are smaller, like your shoulders – buy pattern by chest/ high bust and do an FBA,
– if your hips are larger, like your bust – buy by bust size and do a narrow shoulder adjustment.
If you’re interested in this, it’s best to read Ann’s comments about why her approach is best for her measurements, and her suggestions for other body shapes. This may be another area where you need to try both to see which is best for you !

– – –

The standard FBA method works for tops with fitted armholes and front shaping darts. Debbie Cook has written tutorials for doing FBAs on different styes of tops, which are here.

And there are many other special cases. Do a web search to get over 3,000 links with examples and suggestions to explore !

I hope you don’t have much difficulty with getting a good fit 😀

– – –

P.S. Here’s Imogen Lamport’s advice for people with large cup sizes on how to look good.
And here’s a post from her on layering tops with a large bust.

P.P.S. More resources :

Silhouette patterns are for B, C, D cup sizes.

Butterick patterns (A to D).
Vogue Custom Fit patterns (A to D).
Simplicity patterns for cup sizes A to D

McCall’s 2718 fitting pattern has front pattern pieces for A, B, C, D, DD cup sizes. (Buy by above-bust chest measure, which is on the Butterick and Vogue fitting charts though not the McCall’s one).

Here is blogger Shams’ fitting advice for people she calls the ‘uber busty’ (larger than D).
And here’s her resources for the busty.
The Curvy Sewing Collective has a series of posts about big darts starting here.

Connie Crawford has a series of master patterns for cup sizes from A to I :
basic bodice sloper with darts
shoulder princess
armhole princess
Video intro to these patterns on fitting for cup size.
Plus a video intro on
using these patterns as a starting point for making your own designs.
The videos refer to the basic sloper with darts (CS1201), but apply to the other master patterns as well.

Step-by-step detail about doing an FBA or an SBA on an existing pattern, from Colette Patterns here.

– – –

Links available February 2011