Make everything from one pattern ?
Make your whole wardrobe using just one pattern ?
Interested in the challenge of making everything from one pattern ?
And I don’t mean a wardrobe pattern !
For the Pattern Review One Pattern Many Looks contest e.g. 2016 you have to choose one view of a pattern. They only allow you to make changes in fabrics and trims.
They specifically exclude doing any pattern work, apart from fitting.
Personally I find it more fun to do some simple pattern work. I know many people don’t want to change patterns, but the alterations suggested in this post are simple.
Some of these pattern changes make different garment types, such as jumpsuit to dress, skirt, coat. Others involve more subtle changes to style elements : collars, pockets, front openings – good if detailed differences delight you 😀
Basically you’re doing the simplest aspects of pattern making, as taught in the big college pattern making tomes, but you’re starting from what is already a pattern in your style, instead of from a fitted body sloper.
– – –
A starter pattern
Several years ago I wrote a post on using one top pattern for a dress, top, jacket, vest, coat.
The pattern I used is now out of print.
This time I’m starting from Simplicity 8060 (2021 – that is also discontinued), a Mimi G jumpsuit pattern.

2021 : use Sew Over It’s Farrah jumpsuit pdf/A0 pattern : (body bust 31″-46″) with dropped shoulders, 4 flap pockets, and no yoke.

Or McCall’s 7330 (body bust 30″-49″), a less casual style, already includes sleeve and leg length, collar, pocket and belt variations.

The Merchant & Mills Thelma is for body bust 31″-56″.
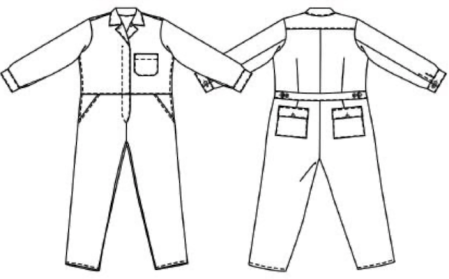
If those aren’t your style, there are many other jumpsuit patterns. You could do these simple pattern alterations starting from any pattern with sleeves and waist seam. I collected some on this pinterest board. 2021 : jumpsuits are current, so there are many more.
Or of course you could instead work the other way round, and use your favourite top and pants patterns to make a jumpsuit. Make the length of the top pattern at your personal bodice length (nape of neck to waist) plus 1-2” / 3-5cm, to allow for movement. If you’d like a tutorial, here’s a video from Wonder How To.
If you find you enjoy this process, you’ll probably find it’s less work to start, not from the original multi-size pattern, but from a tracing of your size. Perhaps with some adaptations for you, such as different sizes for top and bottom, or adjustments to bodice and crotch length. Also tracings of one or two sizes larger, to use for layers such as jackets and coats. An investment in time that saves time later.
If you become a true addict of this process, you’ll want to transfer the basic pattern pieces to card so you can trace round them every time they’re used.
Most of these pattern altering ideas don’t just apply to one pattern. They’re general pattern altering skills which can be applied to many other patterns as well. I’ve begun a pinterest board of some patterns that are easy to change.
– – –
Some simple ideas for what you can make from a jumpsuit pattern
(Apart from a jumpsuit !)
Style elements
– move / omit / change shape of patch and slant pockets.
More complex pocket changes : guides to making different pockets in this post.
– change the shape of the collar : round the corners, or use only the band.
More complex collar changes : patterns for many collars from momosAtelier – some are detached, the ones with partial front in the same fabric are attached to the garment.
Garment type
Use pattern pieces for jumpsuit top and bottom separately.
Use a larger size of the top for a bomber / blouson jacket.
Use the casing and drawstring for the waist.
Make a dress with a waist seam, by adding a gathered rectangle of fabric below the waist instead of the pants. Any length from mini to maxi. How about using some special occasion fabric ?
Several examples of commercial patterns which do that on this pinterest board.
Use the pants pattern pieces to make gathered waist pants.
Use the casing and drawstring for the waist.
(Converting a jumpsuit pattern with a continuous opening from neck to crotch into pants : continue using the buttoned front opening at CF of pants – cut off above waist, or ignore the placket opening on the pants CF seam and extend the casing around the complete waist.)
–
With very little pattern work
These changes can be made direct with the pattern tissue if you want to.
Or for more speed there are even easier methods.
Lengthen or Shorten
Change body, sleeve and leg lengths – see instructions for lengthening and shortening the pattern tissue, given on many pattern sheets.
If you’d like more detailed advice, there are photos of lengthening and shortening in this post from Tilly and the Buttons.
If you’re tracing the pattern, you can just slide it along by the amount needed, instead of needing to cut and paste.
Lengthen the top to make :
shirt / tunic / shift shirt dress without waist seam.
Use a size larger for a shirt-jacket, longer for a duster.
If the top pattern is the same width all the way down from underarm to hem, you can just mark the added length onto the fabric when cutting, with no need to add on tissue. (Well, I need to check that’s big enough for my hips !)
Shorten the length of the jumpsuit pants to make a romper.
Shorten the pants used without the top, to cropped pants, capris, bermudas, shorts.
For speed shortening, just fold back the unwanted part of the tissue when cutting. Though only if the side seam meets the hem at a right angle (see ways of dealing with other angles below).
Omit pieces
Omit collar / cuffs / sleeves.
Make sleeveless tops, vests and sleeveless coats.
Add bias binding to the remaining edge.
Or make a facing pattern, see about 3/4 of the way down this post.
–
With a little more pattern work
For these changes, it’s best to trace the pattern and work with the tracing.
Style elements
Colour blocking and patchwork
Add decorative seams so you can use different fabrics in the same pattern piece. Draw the new seam line across the pattern piece. Cut along this line, or trace the two parts. Add seam allowances to both sides of the new seam.
Change neckline.
Here’s a post on changing necklines.
Close front of top to make a pullover top
Here’s a post on closing the front of a pattern.
Extend that to a shift dress.
Add a variety of half plackets to the top (henley, polo, zip – see this post for links to instructions for sewing these).
Add a full length front opening placket : to a pattern that has not got one, see links in the previous post on starting from one pattern. Change to an edge-to-edge opening, zippered, cut on button band, separate button band, cut-on facing, separate facing.
Change the leg shape of the pants – make them wider or slimmer, flared or bell bottom. Make the same changes to inner and outer seams of both front and back, to retain the balance of how the pant legs fall. If you don’t do this, they will hang oddly.
Garment type
To make a skirt from the pants pattern – lengthen downwards from the vertical part of the crotch seam.
Use the casing and drawstring for the waist.
(Going from pants to skirt is much easier than the other way round.)
I’ve extended the stitching lines in this example, as I tend to make my own patterns without seam allowances. You can of course extend the cutting lines.
Remember to add hem allowance.

That diagram is just the first step, marking seams and hem position.
The next step is to make the hem a smooth line, and for that the hem and seam need to meet at a right angle. So if your pattern piece has sloping sides, you need to curve the hem shape. Find a line at right angles to the sloping side that meets the hem about 1/3 the way along, then smooth the wide angled join into a curve.

Finally, check that the front and back side seams are the same length. Move the whole hem up or down if not.
For slight angles between seam and hem, as on sleeves and legs, there’s a much simpler ‘hack’ – just straighten out the tapered seam in the hem area.

(the upper horizontal line and centre vertical lines in this photo are pdf pattern join marks)
Hmm – what about a coat ? Use 2 or more sizes larger of a lengthened top pattern.
For more challenge, add a lining 😀 Easier than you might think : either copy the main pattern pieces exactly and make a reversible item, or make lining pattern pieces which fit onto the facings and hems.
2021 : The Threads magazine book on how to make and sew lining patterns is no longer in print, but you can still find copies, such as from Alibris or Abe Books. The clothes styles may be dated, but not the technique content.
–
Going Further
When you know more about pattern making there could be many other options ! For starters – what styles could you make if you widened some of the pattern pieces so you could add gathers, pleats, tucks.
It may be a long time before you want to go further than all the possibilities in this post. But when you do there are several people who specialise in making this process easy.
Here are some you could try. Use your starter pattern instead of their master pattern.
Judy Kessinger has a couple of books on doing this.
Also many free videos, such as :
Dolman sleeves.
Raglan sleeves.
Princess seam style.
More tops.
More pants.
The Sure-Fit Academy has many videos on changing starter patterns to other styles, not free.
More books :
The Act of Sewing by Sonya Philip has half the book on making simple pattern alterations. The book includes 4 very basic patterns, but you can apply the ideas to your own patterns.
Design-It-Yourself Clothes by Cal Patch tells you how to draft starter patterns to your own measurements. Then instructions for various styles. Again you could use your existing starter pattern.
Cal Patch also has a year long on-line class which focusses on pattern hacking. If you’re lucky and in the right place you can even go to a face-to-face class with her.
Sew Guide has links to many posts on simplified patterns for changing style elements.
For big changes : I suggest making a test garment (muslin, toile) to check the details are as you want them. Professional designers go through many iterations to finalise their designs.
– – –
This post focusses on all the things you can do to make different items from one pattern.
Well, all the things which involve only simple pattern work.
I haven’t mentioned all the possibilities for changing the look of a garment which don’t need any pattern work, such as changing fabric colour, print, type, or adding decorative stitches, appliqués, trims, ruffles, or adding wadding and quilting to some sections, or cutting striped or plaid pieces on the bias.
There are now several posts on these possibilities : see posts on repetition, embellishment, and textile skills.
This post used to end with a section listing some other sources which show how easy it can be to alter a pattern.
That section has expanded so much, I’ve now made it a separate post on Simple pattern alterations.
If you love playing with patterns, all this can be a fun and fascinating thing to do 😀
– – –
First published November 2016, some additions and links checked October 2021, links checked July 2024.
2024 : There are now several posts on making pattern variations at Aim for Quality.
Simplest pattern hacking.
From pullover top to open front.
= = = = =
Explore posts in the same categories: pattern making for clothes
November 29, 2016 at 8:19 pm
I missed the deadline to comment on the post on choosing a neckline… Can you still clarify something for me? You say “The Triumph of Individual Style is a beautiful and interesting book […] (The proportions of the clothes in this book are very outdated, so just look at the general principles for a wealth of helpful ideas.)” I read this book a looong time ago but I don’t have it now. My memory is that one of the main points was that the proportions of clothing should be based on the golden ratio. Is that the part that is outdated? I’m surprised because I’m guessing the authors would say that the golden ratio is found in nature and has been recognized since classical times! Thanks for your help!
December 1, 2016 at 1:32 pm
If you see a copy of the book again, you’ll see that the clothes are very much of the era when it was written – big shoulders and slim hips. As the golden ratio has been around for more than 2000 years, I don’t think that gets dated !
November 12, 2016 at 3:52 pm
Great post. Glad you’re back. Barbara
November 12, 2016 at 2:23 pm
Nice post. I have often made skirts from trousers, but never the other way around…
November 12, 2016 at 4:11 pm
Yes Kate, pattern making courses for pants often start from a well fitting skirt pattern, and turning that into pants isn’t at all a simple thing to do.
November 13, 2016 at 8:19 am
Gosh, that is interesting! Thanks for the info.